Category Archives: Investigations

Celery Experiment

Standard

The kids don’t really like to eat celery (though I do), but they weren’t averse to using it for an experiment. What happens when we place celery tops into cups of coloured water?

At the start.

At the start.

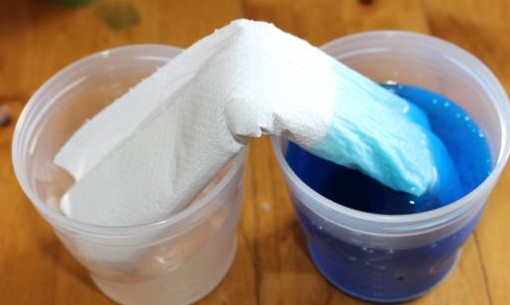
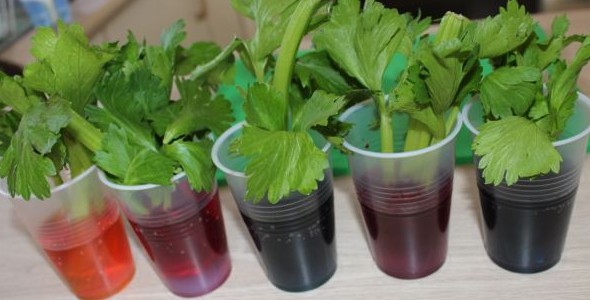
We chose five food colours, red, pink, green, yellow and blue. We placed some of each colour into five separate plastic cups and then filled the cups up to about half way with water. Each cup got its own celery top. I asked the kids what they thought would happen if we left them like that, they both thought the celery would suck up the water. We also talked about what would happen to the colours, and would we see a difference between the colours. I was predicting that blue and red would produce the most dramatic change, and L predicted that yellow and green wouldn’t do anything.

We left the celery for about an hour. By this time, we could see some colour rising up the stalks, and travelling through the leaves. The pink and blue ones had the most obvious change in colour.

Pink, blue and red (l-r) after an hour.

Pink, blue and red (l-r) after an hour.

After an hour.

After an hour.


After about 24 hours, much more of the colour had been transferred from the cups into the leaves, producing a mottled effect on the leaves. We could also see the colour in the stalks. The red, pink and blue showed a major change in the colour, while the yellow and green ones were much harder to see. Looking closely at the green one, we could see the colour where some of the leaves were a little damaged, and around the edges of the leaves. The yellow one’s leaves appeared somewhat brighter than before the experiment, and we could see the yellow around the top of the stalk, but compared to the other colours, it was very difficult to see what had happened.

After 24 hours, the red, blue and pink (l-r) had a dramatic change.

After 24 hours, the red, blue and pink (l-r) had a dramatic change.

This little experiment demonstrates the way plants suck up water throughout their stem and leaf systems. It is another example of capillary action at work. L was quite interested in it, but A mostly just liked the pretty colours the celery had turned 🙂

Dinosaur Dig

Standard
Sporting some stylish eye protection.

Sporting some stylish eye protection.

Another of our purchases from Lincraft was a Dinosaur Dig Kit, including a sand block containing a dinosaur skeleton, some goggles, and some tools for excavating the bones. L loves dinosaurs, and she was super excited to get into a dig. Big L set her up at the table after A was in bed. He placed the block on a wooden board to minimise the mess. L donned the goggles, and got to work. She worked patiently and carefully, concentrating hard on her excavation. Using the mallet and peg, she dislodged some of the block to reveal a small section of bone. She was able to use the paintbrush to remove some of the dust from the protruding bones carefully.


Using the mallet.

Using the mallet.

The dig site shut when it was time for L to go to bed, and re-opened the following night. It took four or five nights for her to completely uncover the skeleton, which was in pieces.

Using the paintbrush to clean off the bones.

Using the paintbrush to clean off the bones.


She soaked the pieces in some water to loosen any sand that was left. She utilised a toothpick to clean out some of the grooves and holes on the skeleton. Once all the pieces were clean and dry, she assembled the skeleton to make her dinosaur.

Soaking the bones.

Soaking the bones.

Using a toothpick to scrape out some sand.

Using a toothpick to scrape out some sand.


L really enjoyed the whole process of the dinosaur dig, and she definitely wants to try another one.

A girl happy with her dino.

A girl happy with her dino.


Magnifying Glasses

Standard
Looking at the tree leaves.

Looking at the tree leaves.

Big L brought home a magnifying glass in a sample bag last week. He gave this to L and found our kids magnifying glass for A. The kids took them into the yard to explore. They looked at leaves, grass, bugs, feathers, flowers, the concrete path, pegs, and many other things, including their own hands and feet. This gave the kids a different perspective on the outside things that they see every day. They really enjoyed using the magnifying glasses, and have asked to explore with them again soon.

Investigating a leaf.

Investigating a leaf.

Investigating a curled up leaf.

Investigating some bark.

Marshmallow Sculptures

Standard
Marshmallow and straw building.

Marshmallow and straw building.

We practiced our architectural skills using marshmallows, plastic straws and toothpicks. It was lots of fun, and the kids loved eating the marshmallows once they were finished 🙂

Marshmallow and toothpick house.

Marshmallow and toothpick house.

L discovered that the toothpicks worked better than the straws, as they were shorter and stronger. She also found that using triangles as her base shape created a stronger structure that could be built up much taller than those made with squares.

After the tower building was complete, both L and A made some original sculptures using the marshmallows.  I particularly liked L’s ‘Cat doing splits’.

Making crazy sculptures.

Making crazy sculptures.

Spiky echidna.

Spiky echidna.

Cat doing splits.

Cat doing splits.

Paper Towel Water Bridge

Standard

I remember in primary school science doing some activities using paper towel and water and I wanted to show the kids. Paper towel is great at soaking up spills, though I tend to use washable cloths to clean up spills in our house for a number of reasons including environmental and cost (due to the large number of spills that occur…) I still keep some paper towel on hand though, for those jobs when it is unsuitable to use a washable cloth.

Prior to placing the paper towel.

Prior to placing the paper towel.

For this one, we needed two cups, water and paper towel. I made the water blue using food colouring, so that it was easier for the kids to see the movement of water. We started with blue water in one of the cups.

A few moments after putting the paper towel into the water.

A few moments after putting the paper towel into the water.

A couple of minutes later.

A couple of minutes later.

I rolled up about three sheets of paper towel into a cylinder, and placed one end into the water, then I bent the paper towel over so that the other end rested in the other cup. We could already see the blue water rising up the paper towel.

I asked L what she thought would happen. She thought the water would soak the paper towel, and move over into the other cup. The water did walk over the paper towel ‘bridge’ into the other cup. She also suggested that the water would continue to move along the paper towel until there were equal amounts of water in both cups. I was impressed with her insight.

When we checked back after an hour or so.

When we checked back after an hour or so.

The paper towel is absorbing the water through something called capillary action or wicking. This phenomenon allows the water to be sucked upwards into the paper towel through the small spaces between the towel’s fibres. The force of gravity will eventually become too great for the upward motion of the water to continue. In this case though, the paper towel is draped over into the other cup, which allows the water to continue to the end of the paper towel. Once the paper towel is soaked, the water drips into the empty cup until the water level equalises in both cups.

I think we might try some variations on this theme in the future. I am wondering what would happen if we started with two or more different cups of coloured water, and placed some paper towel from each of these into the same empty cup. Would the colours mix in the cup? Do all the cups still end up with an equal amount of water? And what happens if the cup with the water in it is placed higher than the empty cup? Does the water still equalise in the two cups? Lots of questions for next time. I will ask these questions of L and A to see what they think.

A Puzzling Afternoon

Standard
A proud of her helicopter rescue puzzle.

A proud of her helicopter rescue puzzle.

We love doing puzzles, but we’ve already done all the ones we own multiple times. I had been thinking of getting some new ones, but L’s school has a great range of puzzles that they rotate through the classrooms and the library that we can use, so I’d been putting it off . A and I often spend a couple of mornings each week doing puzzles in the library after we’ve taken L to class. L will sometimes do a puzzle there if we have enough time before class begins, but she isn’t as interested in puzzles as A. We encourage both of them to do puzzles, as they are not only fun, but they are great for hand eye coordination and logic skills.IMG_2137

IMG_2134Last week our neighbour gave us two bags of secondhand puzzles for the kids, so we spent the afternoon sorting through them, and doing them all. There was a mix of wooden board puzzles, large floor puzzles, a counting one, a couple of cube puzzles and some simple jigsaws. I think they enjoyed the floor puzzles best. Most of them were a little easy for L, but she still had fun putting them together with us. It was nice to spend a couple of peaceful hours doing puzzles with the kids and Big L while baby T slept.

IMG_2125 IMG_2118

Sprouting Birdseed

Standard

Now that’s it’s spring, we’ve started barbequing again. We love to use the bbq, and eat outside when it’s nice. Having our first BBQ of spring made me think of plastic plates and napkins. And since the kids had been playing with a tub of birdseed earlier in the day, I thought we could have a go at growing some of it.

Pre-wetting the napkins.

Pre-wetting the napkins.

Turns out we didn’t actually have plastic plates, but Big L found some plastic bowls and napkins hidden away on top of a cupboard. The kids took two bowls each, lined them with a couple of napkins, and then sprayed them with water. Then they each tossed some wild birdseed into the bowls, and sprayed them again. A was a bit disappointed when nothing happened straight away.

Birdseed in the bowls.

Birdseed in the bowls.

We moved the bowls into a spot on the dining table where the sun shines through a window in the mornings. Both L and A have been very dedicated in watering the bowls at least twice a day (along with the table, floor, and anything nearby).

A spraying the seeds with water.

A spraying the seeds with water.

After a few days some of the seeds began to sprout. A was very excited to see the first sprouts coming up. The kids have checked on their bowls multiple times each day to see how they are going, and they have started to notice that the different seeds have different sprouts, and some are different shades of green. L noticed that the different seeds have sprouted at different times, and some are growing more quickly than others. A has been particularly interested in the sunflower sprouts, as the seed shell is still on most of the sprouts, and she’s been wondering if it will come off. I told her she will have to continue to watch and see.

After 8 days.

After 8 days.

This activity has stimulated discussion about the differences between plants and their growth, including what they need to grow. L was a bit sceptical that anything could grow on the paper napkins, as plants normally need soil. Growing them like this has been good because she could see them from the first tiny sprout, that she can’t see when it is growing in soil. She has enjoyed watching the seeds grow, and we will continue to watch them for as long as we can.

The bowl with the best growth (also the most seeds, thanks to A's enthusiasm).

The bowl with the best growth (also the most seeds, thanks to A’s enthusiasm).

After 2 weeks.

After 2 weeks.


Investigating a Coconut

Standard

L asked what was inside a coconut. So we decided to buy one and see for ourselves.

Draining the milk.

Draining the milk.

Both kids held the coconut and touched its rough skin prior to us attempting to open it. Then Big L took a screwdriver to one of the coconut’s eyes, and pierced a hole into the centre. He drained some of the coconut’s milk out through this hole. L was surprised that this milk wasn’t white like cow’s milk, but she didn’t want to try drinking it.

A helped Big L put the milk through a fine sieve to remove the debris from the shell.

Sieving the milk.

Sieving the milk.

Big L upgraded to a bottle opener to make the hole bigger so that the milk would drain more quickly, and he let each of the kids use a corkscrew in the hole too.

Using a corkscrew to open a hole in the coconut.

Using a corkscrew to open a hole in the coconut.

Once all the milk was drained, Big L used the dull side of a large knife to tap the coconut’s shell until it weakened, and he was able to cut the coconut open. The kids were fascinated by the white flesh inside the hairy brown shell. We explained to A that this was where the white stuff on the outside of lamingtons comes from (lamingtons being one of her favourite foods at the moment).

Opened coconut.

Opened coconut.

Unfortunately the coconut had a crack in the shell when we bought it (I can thank online grocery shopping for that) and some mould had grown in the crack, infiltrating the flesh, making the coconut unsuitable for eating. We did have fun opening it and seeing what was inside though, and I think we will probably get another one sometime so that we can try the fresh milk and flesh too.