Counting with a Hole-punch

Standard

Putting holes into paper with a hole-punch is almost as much fun as cutting paper into tiny pieces with the scissors… At least according to A. Both are good for her fine motor skills and coordination. Both have the potential for a huge amount of mess, which is very appealing to her , yet not quite so appealing for me! Using the hole-punch makes less mess as long as she doesn’t open the part where the little punched out circles collect… And we can use it for a simple counting activity.

We used a single hole-punch as it is easier for A to use. I cut up some paper and wrote numbers on each piece, then asked her to punch that amount of holes into the paper. Initially I left the sections together, but quickly realised she would need the sections separated to make it easier to punch the holes around the edges of the paper. So I cut the paper into separate pieces for each number. She really liked doing this activity. She carefully counted each hole to make sure she got the right number on each section of paper.

Once A had finished with the hole-punch, L used it to make lots of holes in a piece of scrap paper, just because it is fun 🙂

IMG_2310IMG_2313IMG_2316


Collage Craft

Standard

IMG_2301What kid doesn’t love using glue? I gave A a pot of Clag glue, a piece of paper and some collage materials. I’ve got to watch her like a hawk with the glue, otherwise it ends up all over the place, and often in her hair, which is yuck. She just likes to put glue anywhere and everywhere. When she does get the glue on the paper she can make some fun and colourful collages. I’ve been trying to get her to put the glue on the paper first and then stick different items onto the glue sections. She likes to put the glue onto the item instead, which means getting glue on her fingers, and then everything sticks to her. She alternatively likes this and hates it.

IMG_2302IMG_2306

L also did some collage art, but she made a picture of a robot on hers. And because A was hogging the glue, she used sticky tape to affix her picture.

IMG_2311

Toy Binoculars

Standard

Today we made some toy binoculars out of toilet paper rolls. I stuck two rolls together for each of the kids and let them decorate the rolls with stickers and textas. L also added some red crepe paper to the end of hers so that when she uses them the crepe paper will hang down and blow in the breeze. I used the hole punch to put holes in the sides and attached some string so the kids can hang them around their necks. Now the binoculars are ready to use when we go exploring!

Finished binoculars.

Finished binoculars.

Decorating.

Decorating.

m&m Maths

Standard

A bag of m&ms can be yummy and educational! We bought a bag of m&ms on the weekend, but before the kids scoffed them down, I got them to do some activities with them.

First they sorted them out based on colour. A liked picking up the blue ones best. They put each colour into separate little bowls.

Before sorting.

Before sorting.


During sorting.

During sorting.


Then they laid each colour out into lines, to visualise which colour was the most and least plentiful. L counted each colour by twos, recorded the amount, and wrote it in tally form. A tried to count some of them too, but got tired after reaching 20 and told me I could do the rest.

Laying the m&ms out.

Laying the m&ms out.

L's count of the m&ms.

L’s count of the m&ms.


L added the numbers for each colour together to find out how many m&ms were in the bag.

Making a pattern.

Making a pattern.

Continuing a pattern.

Continuing a pattern.

A made some patterns with the m&ms and placed the next m&m onto the end of some patterns I made. L did some patterns too, and then made a self-portrait in m&ms. Unfortunately she swiped it away before I had a chance to get a photo. It was pretty neat though.

And finally I let them eat some 🙂


Sticker Counting

Standard

A nice simple activity for A to practice her counting involves stickers, one of her favourite things. She loves to use stickers, placing them on paper, tables, chairs, cupboards, toys, the floor and even herself. I’ve had to remove a lot of stickers from places they shouldn’t be, and it’s really hard to get the sticky residue off clothing when it goes through the wash with a sticker attached. None the less, we keep stocked up on stickers because they are fun and both L and A enjoy using them a lot. So on a sheet of paper I divided each side into six equal spaces (folded in three, then in half) and wrote the numbers 1-6 on one side, and 7-12 on the other. Then A placed stickers in each space corresponding to the number written there. She enjoyed placing the stickers, and she carefully counted them as she put them on the paper.

IMG_2244IMG_2247


IMG_2249IMG_2255


You may also enjoy Starry Stars and Sticker Names.

Four Easy Spelling Activities

Standard

We try to do lots of different spelling activities with L to keep it interesting and fun. Here are four quick and easy activities that we have done this weekend.

1) Sticker words. Grab some alphabet stickers and get spelling. We have lots of different sets of stickers so each letter can be different. Some alphabet stickers only have one of each letter though, so I needed to look for sticker pages with extras of each of the common letters, such as ‘e’ and ‘t’. It would be great to find a sticker sheet with just lots of vowels. L likes this activity and it is very quick and easy.

IMG_2252IMG_2253


2) Highlighter words. Never underestimate how much kids like to write with highlighters. L used a pack of six different coloured highlighters to make her words bright and colourful.

IMG_2273IMG_2276


3) Paint Pens. L found these drip-free paint pens by Crayola in Officeworks. The paint is contained in the barrel of the pen, and is applied by the brush tip, just like writing with a pencil. No mess, and easy to use.

IMG_2271IMG_2272


4) Glitter Glue. This was the messiest activity, mostly because the glitter glue takes ages to dry, and the kids kept touching it to see if it was still wet. L liked using the glitter glue tubes, writing her words much as she would with a pen. She put the glue on pretty thickly, and being a cool day, it took a very long time to dry. If I owned a hair dryer I think I would have tried using it to speed up the drying time.

IMG_2278

Candlestick Painting

Standard
Writing with the candle.

Writing with the candle.

We don’t let the kids play with fire, but we do let them use unlit candles to draw with! Just the plain old white ones that I keep in the drawer for electrical outages are like using a fat crayon to draw with. They can draw their picture or write a message on white paper with the candle, and it’s difficult to see, but when they paint over the wax with water-colours, the picture comes to life. It’s fun to watch the picture or words emerge, and then when the paint dries, we have a great picture. IMG_1869IMG_1871


L also used this method to practice her spelling words last week.

Spelling words.

Spelling words.

Paper Towel Colouring

Standard

IMG_2232

Coloured water ready.

Coloured water ready.

Dropping pink water onto the paper towel.

Dropping pink water onto the paper towel.

We ran out of paper to paint on this week, so we tried painting some paper towel with water coloured with food colouring. We used eye droppers (bought at the chemist) to drop the coloured water onto the paper towel. It was fun to watch the colour spread out as it was soaked up by the paper towel.


Dipping the paper towel in the water.

Dipping the paper towel in the water.

We also folded the paper towel up and carefully dipped the corners into the coloured water. Once each corner was done, we unfolded the paper towel to reveal the neat patterns it had formed.

The dipped paper towel folded out.

The dipped paper towel folded out.

Paper Towel Water Bridge

Standard

I remember in primary school science doing some activities using paper towel and water and I wanted to show the kids. Paper towel is great at soaking up spills, though I tend to use washable cloths to clean up spills in our house for a number of reasons including environmental and cost (due to the large number of spills that occur…) I still keep some paper towel on hand though, for those jobs when it is unsuitable to use a washable cloth.

Prior to placing the paper towel.

Prior to placing the paper towel.

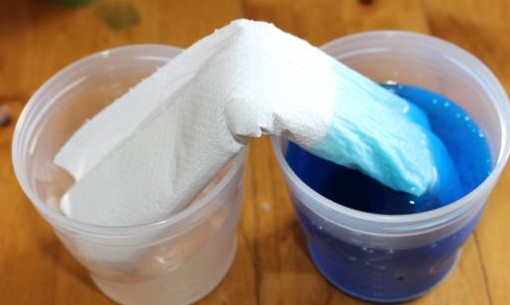
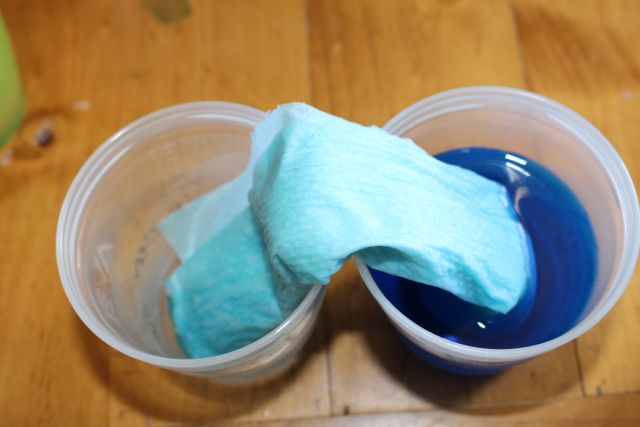
For this one, we needed two cups, water and paper towel. I made the water blue using food colouring, so that it was easier for the kids to see the movement of water. We started with blue water in one of the cups.

A few moments after putting the paper towel into the water.

A few moments after putting the paper towel into the water.

A couple of minutes later.

A couple of minutes later.

I rolled up about three sheets of paper towel into a cylinder, and placed one end into the water, then I bent the paper towel over so that the other end rested in the other cup. We could already see the blue water rising up the paper towel.

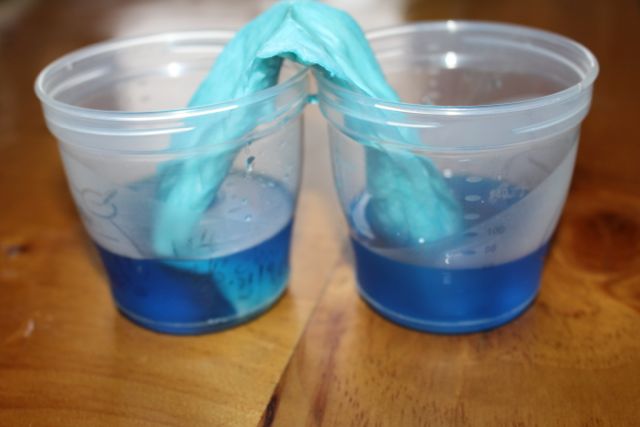
I asked L what she thought would happen. She thought the water would soak the paper towel, and move over into the other cup. The water did walk over the paper towel ‘bridge’ into the other cup. She also suggested that the water would continue to move along the paper towel until there were equal amounts of water in both cups. I was impressed with her insight.

When we checked back after an hour or so.

When we checked back after an hour or so.

The paper towel is absorbing the water through something called capillary action or wicking. This phenomenon allows the water to be sucked upwards into the paper towel through the small spaces between the towel’s fibres. The force of gravity will eventually become too great for the upward motion of the water to continue. In this case though, the paper towel is draped over into the other cup, which allows the water to continue to the end of the paper towel. Once the paper towel is soaked, the water drips into the empty cup until the water level equalises in both cups.

I think we might try some variations on this theme in the future. I am wondering what would happen if we started with two or more different cups of coloured water, and placed some paper towel from each of these into the same empty cup. Would the colours mix in the cup? Do all the cups still end up with an equal amount of water? And what happens if the cup with the water in it is placed higher than the empty cup? Does the water still equalise in the two cups? Lots of questions for next time. I will ask these questions of L and A to see what they think.

Straw Spelling

Standard

The left over straws from our straw necklaces came in handy for a spelling activity with L. She used them to form the letters in each of her words. She just placed them in the right shapes on the board so they could be re-used for more words or other activities. It would have also worked to have glued them in place on some paper.

IMG_2171IMG_2180