Investigating a Coconut

Standard

L asked what was inside a coconut. So we decided to buy one and see for ourselves.

Draining the milk.

Draining the milk.

Both kids held the coconut and touched its rough skin prior to us attempting to open it. Then Big L took a screwdriver to one of the coconut’s eyes, and pierced a hole into the centre. He drained some of the coconut’s milk out through this hole. L was surprised that this milk wasn’t white like cow’s milk, but she didn’t want to try drinking it.

A helped Big L put the milk through a fine sieve to remove the debris from the shell.
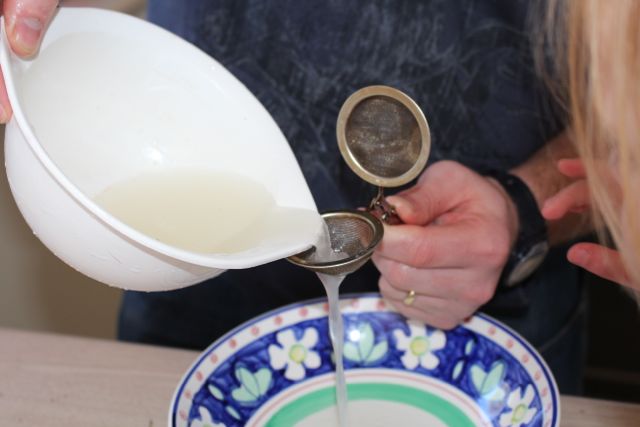
Sieving the milk.

Sieving the milk.

Big L upgraded to a bottle opener to make the hole bigger so that the milk would drain more quickly, and he let each of the kids use a corkscrew in the hole too.

Using a corkscrew to open a hole in the coconut.

Using a corkscrew to open a hole in the coconut.

Once all the milk was drained, Big L used the dull side of a large knife to tap the coconut’s shell until it weakened, and he was able to cut the coconut open. The kids were fascinated by the white flesh inside the hairy brown shell. We explained to A that this was where the white stuff on the outside of lamingtons comes from (lamingtons being one of her favourite foods at the moment).

Opened coconut.

Opened coconut.

Unfortunately the coconut had a crack in the shell when we bought it (I can thank online grocery shopping for that) and some mould had grown in the crack, infiltrating the flesh, making the coconut unsuitable for eating. We did have fun opening it and seeing what was inside though, and I think we will probably get another one sometime so that we can try the fresh milk and flesh too.

Yarn Painting

Standard

Once we’d finished doing our rubberband splat paintings we had some leftover paint on our tray. I didn’t want to waste it, so we decided to try doing some painting with lengths of yarn.

Using one colour at a time.

Using one colour at a time.

Adding colour.

Adding colour.

More colour.

More colour.


We put each piece of yarn into a single colour and covered the yarn with paint. Then one at a time, the kids dropped the yarn onto the paper in random patterns. They used all the different colours we had out to make some lovely rainbow paintings. It worked much better if there was more paint on the yarn so that it left thicker marks. The different colours were overlaid as the kids added more paint to their paintings. Once we’d done a couple of practice ones on paper, we used more of the mini canvases to make a final painting.

Finished mini-canvases.

Finished mini-canvases.

These canvases will be added to the father’s day presents the kids have made for their Dad.

Rubberband Splat Painting

Standard

We are trying out some new ways to paint. I remembered seeing this technique at L’s playschool once, and wanted to try it at home.

IMG_1659We took a little box of thick cardboard and placed some thin rubber bands around the box. We practiced with paper first, and then used some mini canvases I’d picked up from the dollar shop for the final painting. IMG_1660

We put the paper/canvas in the box underneath the rubber bands, then painted the rubber bands one at a time and flicked them so that the paint splattered onto the paper/canvas. It was great fun, though we did get paint all over our hands, and some even splattered up onto A’s face and hair. I’m very happy with the results. IMG_1666

The kids are adding these to their parcels to give their father for father’s day this weekend. Hopefully he likes them!

Sidewalk Chalk Drawing

Standard

IMG_1552Sidewalk or jumbo chalk is such great fun all year round. The kids took it out to the driveway this afternoon in the late winter sunshine. L wrote her spelling words in various colours and A drew a lot of ‘X’ marks the spot…. I have no idea what lies beneath those x’s, and I don’t fancy digging up the driveway to find out!

L doing her spelling.

L doing her spelling.

They also drew self portraits. The really tiny green bit on A’s is her neck, the long lines are her legs standing on grass.

A's self portrait.

A’s self portrait.

L's self portrait.

L’s self portrait.

Jelly Dig

Standard

The kids love to eat jelly in just about every flavour. They like to slurp it up, and squish it between their teeth, and unfortunately, drop it on the floor. So I wondered if they would also like to play with it. I was going to just make up a batch of jelly that they could stick their hands into, but then I saw a ‘Jello Excavation’ at Tinkerlab, and thought that would be even more fun. IMG_1350

So I made up two packs of lime jelly and as it cooled I dropped little plastic bugs and critters into it. I think I might have added too much water though, as the jelly was a bit soft. Then again, it was Coles brand, and I normally use Aeroplane jelly, so maybe it was meant to be like that.

Squishing the jelly.

Squishing the jelly.

Being a little wobblier than normal made it harder to get it out of the bowl in one piece, despite the spray oil I’d used in the bowl, but most of it came out intact. I placed it in a tub and put it outside for the kids to play with. I’m very glad it was an outdoors activity as, predictably, A got into the tub with the jelly before they were finished. She said it was to feel it squish between her toes. She likes to feel all of our messy and sensory play things with her feet… maybe she just likes to be extra messy 🙂

They used various implements to pull the critters out, and play in the jelly. They added in some pretend play too, making up gross critter food orders, such as bug soup with a side of slug slime and a snake milkshake. The jelly got thoroughly churned with a whisk, and was pushed through a sieve, put into cups and funnels, and spooned into the watering can, along with most of the critters. No one tried to eat the jelly, which surprised me.

Rescuing the bugs and animals from the jelly with tongs.

Rescuing the bugs and animals from the jelly with tongs.

Pushing jelly through a funnel.

Pushing jelly through a funnel.

It was very messy, but very fun.

I found an old tin of edible gelatin in the cupboard this morning, so I think I will use that for our next jelly play. I will make it firmer so that the kids can cut it into chunks and really excavate the bugs and critters, maybe with some spoons as digging implements. Looking forward to another chance to have a jelly dig in the backyard.

Whisking the jelly.

Whisking the jelly.

Snowflake Wand

Standard

It is book week this week, and L’s school is having a book week parade. All the kids and teachers get dressed up as a character out of a book. For the past two years L has chosen to go as a fairy, and this year was no different. She chose Carrie the Ice Cap Fairy from the Rainbow Fairy book series. These books have been a favourite in our house for some time. Carrie is a blue fairy, so I found some blue wings at the Reject Shop, and we picked out a blue outfit from her wardrobe, but we decided to make a wand to go with her costume. IMG_1201L wanted a blue wand with a snowflake on the end. So we got busy making paper snowflakes. I showed L how to make squares from rectangular pieces of paper, and then to fold them over and over and then cut the edges. We used scissors and a hole punch to make different shapes. L’s first couple of attempts didn’t quite work, but she got the hang of not cutting right through pretty soon. A’s attempts all resulted in a lot of paper on the floor 🙂

We ended up with a number of very pretty blue and white designs.

A's attempts.

A’s attempts.

My attempts at snowflakes.

My attempts at snowflakes.

L's attempts.

L’s attempts.

For the wand’s shaft we cut up a cardboard roll from some wrapping paper, and rolled it more tightly to give the wand a slight cone shape. Then Big L painted it blue and sprinkled glitter on it (glitter really makes a wand!). Once it was dry we attached the snowflake L had chosen to the end, and voila, one beautiful snowflake wand!

Painting the wand.

Painting the wand.

Finished wand.

Finished wand.


Magnetic Letters Spelling

Standard

IMG_1128A while back I bought a set of magnetic letters and words from the school bookclub. Using them quickly became one of L’s favourite spelling activities. We could put them on the magnetic board, or on the fridge, but we have fun just laying the letter tiles out on the floor. It is a quick and easy activity to practice her spelling.

IMG_1130IMG_1131


Spelling Disco Poster

Standard

Every week L gets a short spelling list of five words to learn. We like to try different activities using the words to keep it interesting. After making some posters for the school disco and for book week, L decided to make a poster for her spelling words.

She wrote the words at the top in coloured pen, and then drew a disco ball, because all good posters need a disco ball 🙂 Then she added some coloured card with animal stickers and some black paper with stars drawn on it in lead pencil. It was completely her own design and she seemed happy with the result. We stuck the finished poster into her spelling book ready to take to school.

Working on her poster.

Working on her poster.

The finished poster.

The finished poster.

Funky Cardboard Glasses

Standard

We got the craft box out this afternoon. It is overflowing with all sorts of items useful in our craft activities. I really must sort it out though, it has become extremely messy with the kids pulling things out and then shoving them back in.

Exploding craft box.

Exploding craft box.

There was a pack of plain cardboard glasses frames, and A decided to decorate a pair.

IMG_1037She used textas to colour the glasses first. She also added some animal stickers, colouring a section of the frames in green texta so that the animals had some grass to stand on. There was some ribbon and lace scraps added, and the lenses are green cellophane. When A popped the glasses on she said, “They make everything look green!”. She was quite amazed.

Finished glasses.

Finished glasses.

A also used this time to cut some paper up. She loves using scissors.

Practicing with scissors.

Practicing with scissors.

Marbles and Suction Cups

Standard

We recently bought a cool rubber bath mat with ducks on it. It looks funky in the bath, and the kids love it. The bottom of it is covered in little suction cups, and thanks to Creative Playhouse, we were able to use it for an activity that didn’t involve the bath this morning. IMG_1017

A bag of marbles and a bath mat, add some tongs, chopsticks and large pegs, and we got a great fine motor skill activity.

A using her fingers, L using the red tongs

A using her fingers, L using the red tongs

I placed the bath mat upside down on the deck, with a bowl of marbles. First off, A placed the marbles on the suction cups using her fingers, but that was pretty easy. The red silicone tipped tongs were great for picking up the marbles, but the stainless steel tongs were somewhat difficult to use. L used some chopsticks and the marbles shot out of them across the deck. With some persistence, L mastered the chopsticks and the stainless steel tongs. A preferred the red tongs. We had some large pegs big enough to pick up the marbles, but A didn’t find them particularly interesting.

Using chopsticks.

Using chopsticks and tongs.

I had trouble finding marbles, I thought the cheap shops would have them, but I couldn’t find any. I ended up with a bag from kmart that had all the marbles the same size. I am on the lookout for a bag of assorted sized marbles to try the activity again to see if different sized marbles make it easier or harder. They might be good for an ordering and sorting activity too.

Using the red tongs.

Using the red tongs.