Tag Archives: bunny

My Dead Bunny by Sigi Cohen and James Foley

Standard

deadbunnycover
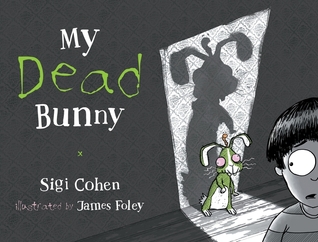
My Dead Bunny by Sigi Cohen and illustrated by James Foley, hardback picture book, published by Walker Books Australia Pty Ltd in 2015.

Brad the Bunny might be dead, but he doesn’t want to leave! A dark zombie picture book, what’s not to love!?

Fun rhyming text complements the wonderful illustrations in My Dead Bunny. The pictures are mostly black and white with green and pink highlights. This works perfectly for the type of story it is. The little worm that pokes out of Brad’s head is orange and so smiley! I liked this touch. In fact, I just really liked Brad. He is adorably freaky, with scary pink eyes pointing off in different directions… just, I don’t want him to wander into my bedroom at night! My favourite picture is where Brad meets his death, it’s so detailed.

The story itself made me laugh. I love the ending. It is the perfect solution! A couple of the rhymes aren’t quite rhymes, but the story still flows. The text is clear and easy to read.

I really enjoy zombie and monster stories and movies, and that has rubbed off on my kids. They have liked films like ‘Frankenweenie’, ‘Paranorman’, and ‘Hotel Transylvania’. So I went ahead and read My Dead Bunny to my preschooler and first grader. They both loved it. My first grader read it again to herself straight away.

Suitable for primary school children, just keep in mind that some kids may be frightened by the zombie bunny. My Dead Bunny is fantastic to share aloud. Try it by torchlight on a dark and stormy night!


* My Dead Bunny is shortlisted for the 2016 Children’s Book Council of Australia Book of the Year in the Picture Book category.


Advertisement

Cardboard Roll Bunnies

Standard

IMG_9557These cute little bunnies are made from toilet rolls, but any cardboard tubes could be used. We covered the rolls with white paper first. We glued the paper to the tubes, and folded the ends inside the tube for neatness.

Making bunny ears.

Making bunny ears.

Drawing on details.

Drawing on details.

Adding a tail.

Adding a tail.


I cut out some pink cardboard for the inner sections of the white paper ears, and L glued the cardboard to the paper. The kids glued two ears into the top of their cardboard roll. Then they got busy gluing on googly eyes and using markers to add the facial features and arms. L also drew a little carrot in the hands of her bunny, which A promptly copied onto her bunny too. L drew her bunny’s feet on, but A wanted to use a white pipe cleaner as feet for her bunny. I cut two small lengths of pipe cleaner, and bent them around to form little feet, then A glued the end of them into the base of her roll.

To finish the bunnies off, the kids glued a cotton ball onto the back of the cardboard roll as a tail. While we had the cotton balls out, L had an idea for making baby bunnies. She made some ears out of paper and markers, and glued them to a cotton ball. Then she added some tiny googly eyes. She gave this baby bunny to A to play with. They called this one Baby Hopsity, and the bigger bunnies were Father and Mother Hopsity.

Baby Hopsity.

Baby Hopsity.

Paper Plate Rabbit

Standard

A made a paper plate rabbit today. It has paper ears, a button for a nose, googly eyes, a pipe cleaner mouth and little pom pom teeth.

IMG_8956

Adding a button nose.

Adding a button nose.

I cut out the ears for A, and she glued them together. Once she had glued the ears to the top of the paper plate, they were a bit floppy, so we added a couple of popsticks behind the ears to keep them upright. A glued down the nose, eyes, mouth and teeth, and then left it to dry.

Adding popsticks to keep the ears up.

Adding popsticks to keep the ears up.

We used the hole punch to put a hole in the plate between the ears and added some string so that it could be hung up in her room. This was pretty simple and quick, and A is very happy with her rabbit.

Bunny Cake

Standard

IMG_8719Big L made a round buttercake, and I decided we should decorate it as a bunny. It was iced with plain white frosting andIMG_8711 then covered in dessicated coconut.

Bunny ears.

Bunny ears.

The ears were made by gluing some pink foam onto white felt, and then when they were dry, I attached them to the back of the cake using toothpicks, so they were sticking up into the air.

I used both normal sized and mini marshmallows to make the nose and the teeth. The eyes are half a marshmallow with a mini m&m as a pupil. The mouth is made out of writing fudge, but I had lots of trouble getting it into the shape I wanted as it didn’t stick to the coconut very well. By the time I came to make the whiskers I was a bit frustrated with the writing fudge, so I started looking for something else to use. I thought about using liquorice, but we didn’t have anything, so I compromised and used dry spaghetti. I broke the spaghetti into the lengths I wanted and then laid the pieces down as whiskers.

Everyone was very happy with how our bunny cake turned out, and even happier when they were eating it!