Tag Archives: kids art

Sugar Picture

Standard

IMG_3655I had initially planned to use salt for this activity, but alas, we had run out of table saltIMG_3659, so we substituted white sugar instead. I’m pretty sure the results would have been the same either way.

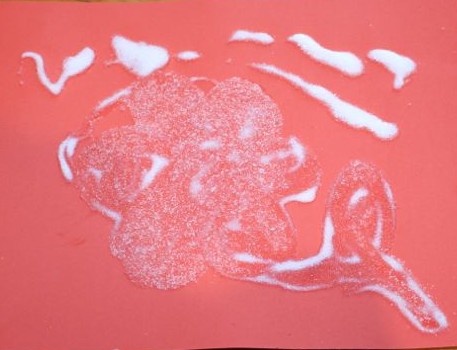
I placed some coloured paper into the bottom of a clean baking tray and then let A paint with some PVA glue on the sheet of paper. While the glue was still wet, she sprinkled (dumped) the sugar onto the paper. I shook the tray around to spread the sugar out, making sure all the glue was covered. Then I shook the excess sugar off the paper back into the baking tray, before pouring it into a bowl with a funnel for the next picture.

IMG_3651IMG_3658


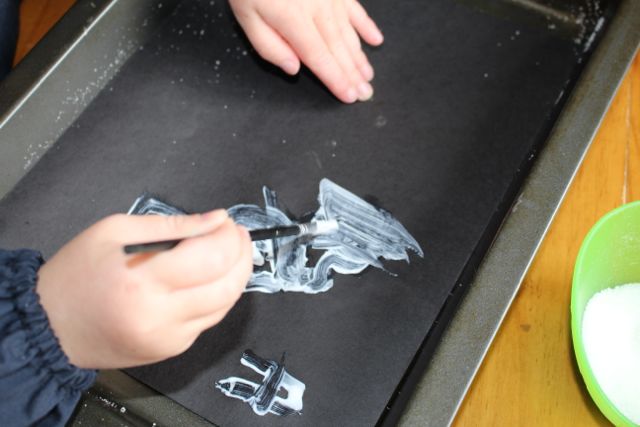
A also tried using the glue straight out of the bottle, but it was really too thick. The sugar started to dissolve where the glue was thick so it wasn’t as easy to see. However, when it dried it did create a 3D picture, which was pretty neat.

IMG_3660


IMG_3661


Leaf Rubbings

Standard

IMG_3545A, Baby T and I were out walking yesterday and A began to collect some leaves. She mostly picked up gum leaves, but she also picked up some maple leaves, silky oak leaves and some other small leaves from a few bushes. It was a motley collection, but perfect for trying some leaf rubbings.

IMG_3537

We sorted through the crayon tub to find some suitable crayons, and A delighted in pulling off the remaining paper covering these crayons (and then just throwing it on the floor like confetti!). We picked fat crayons so they were easier for A to hold. She placed the leaves on the table and covered them with white paper. I held the paper still while she wielded the crayon on its side, rubbing it over where the leaves were lying. She was amazed to see the shapes of the leaves emerging beneath the crayon. She kept calling them ‘leaf fossils’, I think because we did a rubbing of a dinosaur fossil on a recent trip to the museum.

IMG_3540

Contact Window Art

Standard
L's window art.

L’s window art.

We put some clear contact to a use other than covering books today. I cut some rectangles of clear contact and folded them in half, then peeled off the backing from one half, and placed it sticky side up on the table. L and A put little bits of tissue paper, felt scraps and cellophane onto the sticky contact. Once they had completed their collage picture, I carefully peeled the backing off the rest of the contact piece, folding it back onto the other half, enveloping the collage materials between the two halves of the contact. The collage items are held still between the layers of clear contact, and looks a bit like the picture has been laminated.

Placing different materials onto the contact.

Placing different materials onto the contact.

A adding more paper to her contact.

A adding more paper to her contact.

This was a sticky activity, and A kept getting stuck to the contact. L was much better at placing items on the contact without also getting her fingers stuck. It can be challenging to get the two sticky sides of the contact together smoothly and aligned, but it’s not essential for it to be perfect. I just trimmed the edges at the end so that there were no sticky bits left.

A used some blu-tack to stick the finished art to her window.

Art on the window.

Art on the window.

Some window art made with feathers.

Some window art made with feathers.

Easel Painting

Standard

Painting, painting, painting, we love it!

A new Lincraft store has opened nearby, so the kids and I went to check it out last week. We bought a number of things, including some new poster paints. L picked out some fluoro paints, and A chose some glitter paints. We put our new paints to good use on our easel, using a variety of brushes (different sizes and shapes). A mostly likes to just slap the paint onto the paper, making streaks, dots, and swirls. L prefers to paint a picture. Either way, easel painting is fun 🙂

IMG_3372IMG_3369


The finished paintings will go into our present box to be used as wrapping paper.

Sharing the easel.

Sharing the easel.


Squishy Press Painting

Standard

IMG_2907These sort of paintings probably have a real name, but I’ve always thought of them as squishy or butterfly paintings due to the way the paint is squished between the paper, and that the final outcome often looks butterfly-ish.

Blobbing the paint onto the paper.

Blobbing the paint onto the paper.

Squishing the folded paper together to spread and mix the paint.

Squishing the folded paper together to spread and mix the paint.


We like doing these simple paintings. The kids like the way the paint squishes and mixes to make pretty patterns. I pre-folded the paper to make it easier for the kids to see where to put the paint. They blobbed paint onto the paper using paint brushes and then re-folded the paper and pressed down on it to spread the paint. It works best if the paint is near the fold of the paper in blobs of different colours, and don’t let it dry before folding. Pressing the paper away from the fold towards the edge of the paper will spread the paint further, and change the shape of the painting. Open the paper, and there is a pretty painting inside!

IMG_2915


Bubble Prints

Standard

IMG_2902

IMG_2900

Blowing bubbles.

These pictures are fun to make. I mixed some paint with water to make it thinner, and then added a little bit of dish washing liquid to each colour and mixed it all up. A used a straw to blow into the mixture to produce lots of bubbles. L refused to blow through the straw, as she was worried that she would accidentally suck it up into her mouth. That was okay, she still used some paper to make bubble prints after A or I made the bubbles.

The kids carefully placed their sheets of paper over the bowls full of bubbles, transferring the paint onto the paper to make a bubble print.

IMG_2903

Transferring the bubble pattern to paper.

It can become a bit messy when the bubbles pop, as little droplets of paint get sprayed out. When L and A put their heads close to the bubbles they ended up with the droplets on their faces, and in their hair. It was plenty of fun, but the kids needed a bath after we were finished 🙂

IMG_2905

A bubble print.

Yarn Painting

Standard

Once we’d finished doing our rubberband splat paintings we had some leftover paint on our tray. I didn’t want to waste it, so we decided to try doing some painting with lengths of yarn.

Using one colour at a time.

Using one colour at a time.

Adding colour.

Adding colour.

More colour.

More colour.


We put each piece of yarn into a single colour and covered the yarn with paint. Then one at a time, the kids dropped the yarn onto the paper in random patterns. They used all the different colours we had out to make some lovely rainbow paintings. It worked much better if there was more paint on the yarn so that it left thicker marks. The different colours were overlaid as the kids added more paint to their paintings. Once we’d done a couple of practice ones on paper, we used more of the mini canvases to make a final painting.

Finished mini-canvases.

Finished mini-canvases.

These canvases will be added to the father’s day presents the kids have made for their Dad.

Rubberband Splat Painting

Standard

We are trying out some new ways to paint. I remembered seeing this technique at L’s playschool once, and wanted to try it at home.

IMG_1659We took a little box of thick cardboard and placed some thin rubber bands around the box. We practiced with paper first, and then used some mini canvases I’d picked up from the dollar shop for the final painting. IMG_1660

We put the paper/canvas in the box underneath the rubber bands, then painted the rubber bands one at a time and flicked them so that the paint splattered onto the paper/canvas. It was great fun, though we did get paint all over our hands, and some even splattered up onto A’s face and hair. I’m very happy with the results. IMG_1666

The kids are adding these to their parcels to give their father for father’s day this weekend. Hopefully he likes them!