Tag Archives: painting

Paper Plate Santa

Standard

November seems to be passing rather quickly now, so it’s time to break out the Christmas craft!

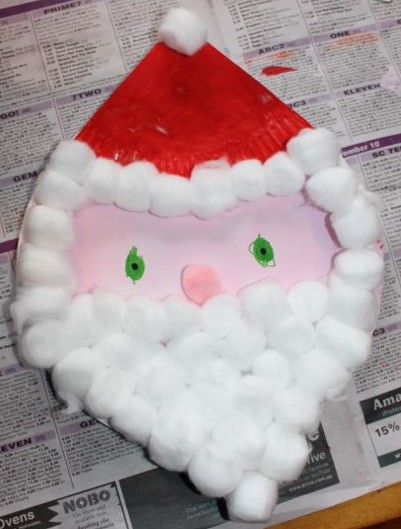
This Santa uses two paper plates, one for the face, and a second cut in quarters to use for his hat and his beard. A painted one of the quarters bright red, and then we left it to dry. I glued another of the quarters to the bottom of the plate so that the edges of the quarter were against the edges of the plate, leaving a triangle to form the beard on. A painted the main plate a pale pink for skin. Once all the paint was dry I glued the red quarter to the opposite side of the plate to the beard quarter, again lining up the edges.
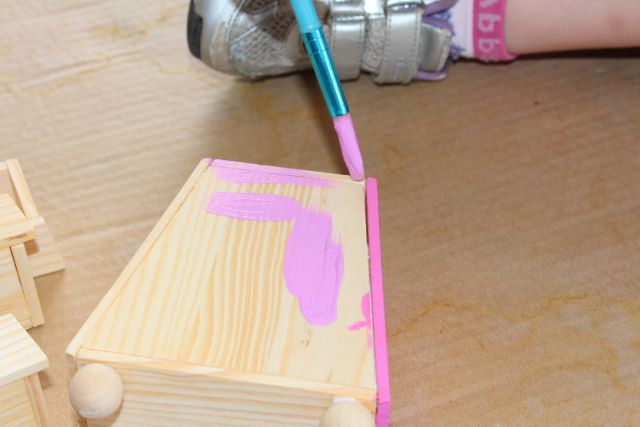
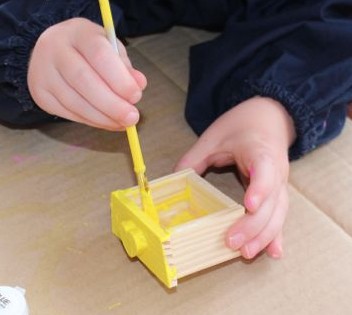
Painting the hat.

Painting the hat.

And now for the fun of gluing on cotton balls! A used PVA to attach cotton balls all over the bottom triangle and part way up the plate to form a white woolly beard. She continued the cotton balls up the sides of the plate for hair. She also put cotton balls along the bottom edge of the red quarter to make a furry edge for the hat. One cotton ball went onto the point of the hat too.

To finish Santa’s face, A used a light pink pom pom for Santa’s nose, and drew two green circles in texta for eyes. I added some black dots to the eyes for pupils. IMG_3673

Sugar Picture

Standard

IMG_3655I had initially planned to use salt for this activity, but alas, we had run out of table saltIMG_3659, so we substituted white sugar instead. I’m pretty sure the results would have been the same either way.

I placed some coloured paper into the bottom of a clean baking tray and then let A paint with some PVA glue on the sheet of paper. While the glue was still wet, she sprinkled (dumped) the sugar onto the paper. I shook the tray around to spread the sugar out, making sure all the glue was covered. Then I shook the excess sugar off the paper back into the baking tray, before pouring it into a bowl with a funnel for the next picture.

IMG_3651IMG_3658


A also tried using the glue straight out of the bottle, but it was really too thick. The sugar started to dissolve where the glue was thick so it wasn’t as easy to see. However, when it dried it did create a 3D picture, which was pretty neat.

IMG_3660


IMG_3661


Stencils with Paint

Standard

IMG_3671A rainy day resulted in lots of craft and art today, so since we had the paints out I dug out our packet of stencils. They are A4 sized plastic stencils, perfect for the kids to use. I put out several sponge applicators, but A decided to use a paintbrush on most of hers.IMG_3670

IMG_3668IMG_3669


One of the stencils has the alphabet on it in both upper and lower case, as well as numbers and some punctuation. L used this to paint out her spelling words this week. It was a bit tricky, as the stencil had to be held up off the previous letters so as not to smudge the paint. There was still some smudging, which might have been reduced if we’d wiped down the stencil in between doing each letter. She used one of the sponge applicators to apply the paint, and had some help from Big L with holding the stencil.

IMG_3685 IMG_3686

Jewellery Boxes

Standard
A's jewellery box kit.

A’s jewellery box kit.

All our friends and family know how much we love doing craft, so the kids are often given craft kits as presents. This year for their birthdays the kids were both given a kit for making a jewellery box. L’s kit contained the box, along with some gel pens and stickers for decorating it. A’s kit was much more complicated, and involved actually building the box prior to painting and decorating it with glitter glue, rhinestones and stickers.

L's jewellery box kit.

L’s jewellery box kit.


L's finished box.

L’s finished box.

L got to work on hers, adding some stickers, and drawing on it. She decided that she would give the finished box to me, as she already has a lovely jewellery box, so she used alphabet stickers to put my name on it. She wrote some things on it like ‘I love you’ and ‘smiles on a rainy day’. She finished hers quite quickly.

There was no way A would have been able to glue her box together. It had almost thirty pieces, and it was a bit fiddly to get it together. The kit came with glue, but it wasn’t very good, and there wasn’t nearly enough of it, so I used PVA instead. I eventually finished gluing it (with much glue all over me too), and then we had to let it dry. A was quite impatient for it to dry. While we waited we checked out the paint pots that had come with the kit. The paint had dried out a lot, but I managed to revive it by adding some water to it. It was still a bit lumpy, but it was good enough to use. A got to painting the outside in different colours, and then painted the drawers as well. She did most of the painting, just asking me to smooth out the edges for her, and she seemed happy with the result.

Drying....

Drying….

Painting.

Painting.

Painting.

Painting.


Once the paint dried, A glued on some rhinestones to the drawer handles, and then put stickers on it. Lastly she added some glitter glue… and by some, I really mean a lot, all in one big blob on the top. We managed to spread it out, but it still took quite a while to dry. She was happy though. Now she is going to keep some of her play jewellery in it.

The glitter glue blob.

The glitter glue blob.

Adding stickers.

Adding stickers.

A's finished box.

A’s finished box.

Egg Carton Spiders

Standard

IMG_3561

We don’t normally do anything for Halloween, it’s not something we’ve really gotten into, but seeing all the decorations available in the shops put me in the mood for making some egg carton spiders. Luckily we have a large supply of egg cartons at the moment, so I pulled one out and cut it up into the individual cups.

Painting the egg carton cups.

Painting the egg carton cups.

The kids painted the egg cups inside and out with black paint (getting a lot on themselves in the process). We left these to dry for a while and then came back to add pipe-cleaner legs and googly eyes. I used an awl to punch the holes for the pipe-cleaner legs, making it easier for the kids to push the legs through. My awl is very sharp, and I didn’t allow the girls to touch it. A still had a lot of trouble putting legs on her spiders, so I helped her put them in and then shape them to give them knees and feet. L was able to put legs on her spiders and make them into a shape that she wanted.


Adding legs.

Adding legs.

Adding a mouth.

Adding a mouth.


A added some red paint to two of her spiders and told me they were red-backs, and one got a big red mouth. L preferred hers just black. I punched a hole into the top of each spider and added some string and then attached them to the ceiling with blu-tack.

IMG_3582

Spiders hanging from the ceiling.

Spiders hanging from the ceiling.

Easel Painting

Standard

Painting, painting, painting, we love it!

A new Lincraft store has opened nearby, so the kids and I went to check it out last week. We bought a number of things, including some new poster paints. L picked out some fluoro paints, and A chose some glitter paints. We put our new paints to good use on our easel, using a variety of brushes (different sizes and shapes). A mostly likes to just slap the paint onto the paper, making streaks, dots, and swirls. L prefers to paint a picture. Either way, easel painting is fun 🙂

IMG_3372IMG_3369


The finished paintings will go into our present box to be used as wrapping paper.

Sharing the easel.

Sharing the easel.


Squishy Press Painting

Standard

IMG_2907These sort of paintings probably have a real name, but I’ve always thought of them as squishy or butterfly paintings due to the way the paint is squished between the paper, and that the final outcome often looks butterfly-ish.

Blobbing the paint onto the paper.

Blobbing the paint onto the paper.

Squishing the folded paper together to spread and mix the paint.

Squishing the folded paper together to spread and mix the paint.


We like doing these simple paintings. The kids like the way the paint squishes and mixes to make pretty patterns. I pre-folded the paper to make it easier for the kids to see where to put the paint. They blobbed paint onto the paper using paint brushes and then re-folded the paper and pressed down on it to spread the paint. It works best if the paint is near the fold of the paper in blobs of different colours, and don’t let it dry before folding. Pressing the paper away from the fold towards the edge of the paper will spread the paint further, and change the shape of the painting. Open the paper, and there is a pretty painting inside!

IMG_2915


Bubble Prints

Standard

IMG_2902

IMG_2900

Blowing bubbles.

These pictures are fun to make. I mixed some paint with water to make it thinner, and then added a little bit of dish washing liquid to each colour and mixed it all up. A used a straw to blow into the mixture to produce lots of bubbles. L refused to blow through the straw, as she was worried that she would accidentally suck it up into her mouth. That was okay, she still used some paper to make bubble prints after A or I made the bubbles.

The kids carefully placed their sheets of paper over the bowls full of bubbles, transferring the paint onto the paper to make a bubble print.

IMG_2903

Transferring the bubble pattern to paper.

It can become a bit messy when the bubbles pop, as little droplets of paint get sprayed out. When L and A put their heads close to the bubbles they ended up with the droplets on their faces, and in their hair. It was plenty of fun, but the kids needed a bath after we were finished 🙂

IMG_2905

A bubble print.

Pet Rocks

Standard

“Can I have a puppy? Can I have a kitten? Can I have a pet bird, frog, fish, mouse…?” Sound familiar? Somewhere around the age of two or three these questions start like a childhood anthem. Kids just love pets, and we’re lucky enough to have a very fluffy cat as part of our family. But if it was left to the kids our cat would rarely be fed, watered or brushed, and his litter tray would never be cleaned out. Big L and I don’t mind doing these things to look after our furry friend, we like having a pet, and the kids are still learning about these responsibilities. But some friends of ours bought a cute little puppy a few months back, and now we are being asked for more pets. We’re not ready for more yet (and I think our cat would be hugely put-out if we brought home a dog!), so we decided to make some pet rocks. These are the kind of pets that don’t take up much room, and they don’t mind if you forget about them now and again.

Some of our pet rocks.

Some of our pet rocks.

We picked out a number of large smoothish rocks and pebbles from one of our garden beds to use for our pet rocks. The smoother the rock, the easier it was to paint. We used paint pens (by Crayola) for ease of painting. These are used like a pencil or crayon, making them easy for A, and give a quick dry, no drip paint experience. If we had used the craft paints we have the effect would have been more vivid, but it would have been messier. Since we were stuck inside due to the weather, the paint pens were a better choice for us on the day. I would like to make some more with other paints outside another day for a different look.

IMG_2414IMG_2419IMG_2413


Once the paint was dry we stuck on googly eyes and used felt scraps and wool scraps to give them some personality. The felt was great for ears and tails. L also used some mini popsticks to glue onto one of hers for legs. She tried gluing some of the rocks together to make bigger pet rocks, but it took ages for the glue to dry, and it was hard to get them to stick together well.

IMG_2423

Yarn Painting

Standard

Once we’d finished doing our rubberband splat paintings we had some leftover paint on our tray. I didn’t want to waste it, so we decided to try doing some painting with lengths of yarn.

Using one colour at a time.

Using one colour at a time.

Adding colour.

Adding colour.

More colour.

More colour.


We put each piece of yarn into a single colour and covered the yarn with paint. Then one at a time, the kids dropped the yarn onto the paper in random patterns. They used all the different colours we had out to make some lovely rainbow paintings. It worked much better if there was more paint on the yarn so that it left thicker marks. The different colours were overlaid as the kids added more paint to their paintings. Once we’d done a couple of practice ones on paper, we used more of the mini canvases to make a final painting.

Finished mini-canvases.

Finished mini-canvases.

These canvases will be added to the father’s day presents the kids have made for their Dad.