Tag Archives: paint

Christmas Stamping

Standard

xmasstamping

We cracked out the Christmas glitter paint and foam Christmas stamps to make some festive art.

stamps

Foam stamps.

Usually I would put the paint onto sponges so that the stamps don’t get overloaded with paint. Unfortunately we were out of sponges, so some of the pictures were a bit gloopy, but they still look nice. And importantly the kids had fun!

stampinggreenstampingred

Advertisement

Hand-print Bookmarks

Standard

IMG_4472For Mother’s Day this year we made bookmarks using the hand-prints of the kids. I found some old scrapbooking papers that had pink or blue heart patterns on them to use as our base for the hand-prints.

Using the paint pad.

Using the paint pad.

A's hand-prints.

A’s hand-prints.

Each child chose the background paper to use, and the colour of paint for their hand-print. Predictably A chose pink on pink for her bookmarks. L used the rainbow paint pad for her hand-prints on the back on the blue paper.  Unfortunately the rainbow paint didn’t come out as clearly as the other paint, but L liked it as it was. The boys used blue paint on blue paper. Using paint pads for hand-prints makes it easy to get a good amount of paint on the hand, and is much less messy than using conventional paint.

Hand-prints.

Hand-prints.

After the hand-prints were dry, I carefully cut around each hand. The kids wrote some lovely messages on the back of one of their hands using a marker. A pushed down her marker quite hard, and the ink is visible through the hand-print. She also drew a lot of love hearts! I love it because it is so unique.

Writing a message on the back of the hand-print.

Writing a message on the back of the hand-print.

To finish the bookmarks I laminated the hand-prints. I arranged the hand-prints so that A’s hands and Baby T’s hands were together to make a bigger bookmark each, while L’s hand-print was big enough as one. I also did a single print of my hand to make a bookmark for my mum. Once laminated, I carefully cut around the hand-prints so that there was a small amount of plastic laminate around each one. The kids were happy with their bookmarks.

One of the boy's bookmarks.

One of the boy’s bookmarks.

A hand-print bookmark in my latest read.

A hand-print bookmark in my latest read.

Sight Words Finger Painting

Standard

IMG_3893Finger painting last week was so much fun, A asked if we could practice her sight words with finger paint. This time we used ordinary poster paint (Baby T was sleeping), and we squirted some into one of our play tubs. The tub was yellow, so we used green paint as it gave us a good contrast.

Squirts of paint.

Squirts of paint.

Smoothing the paint around the tray.

Smoothing the paint around the tray.

A had a great time spreading the paint around the bottom of the tray, squishing and sliding in it. When she was ready, she smoothed the paint across the bottom of the tray, and then proceeded to use the tip of her index finger to write her words. When she had filled the tray with words, she smoothed the paint over, and wrote some more words.

Writing a word.

Writing a word.

Writing more words.

Writing more words.

Painting with Marbles

Standard

IMG_9842

Blobs of paint.

Blobs of paint.

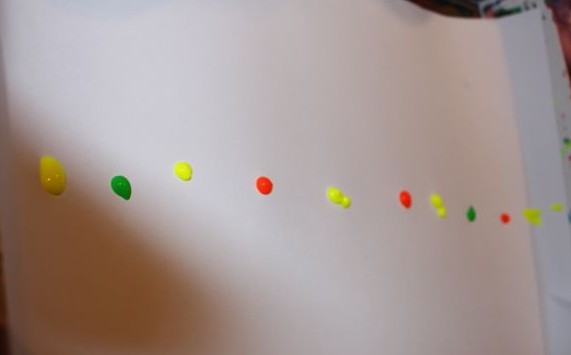
For these paintings each of the kids had a cardboard tray that we laid a piece of paper in the bottom of, then blobbed paint onto the paper. A requested a lot more paint than L.

Rolling the marbles about.

Rolling the marbles about.

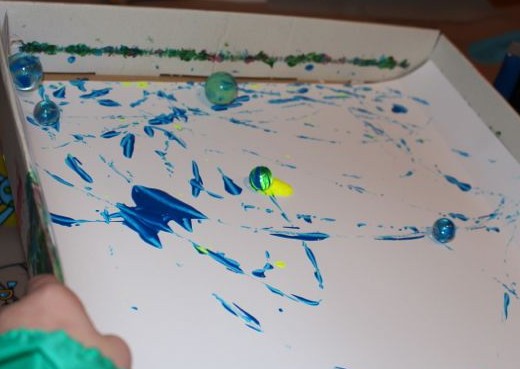
They each chose some marbles to place in their tray. We have a collection of small marbles, and a few larger ones, over which the girls argued. The largest marbles made larger tracks in the paint, but the size of the marbles didn’t really matter for this painting technique. Both L and A placed more than one marble in at a time, and then tilted the tray about to make the marbles roll around. If they tilted the tray too fast the marbles would sometimes fly right out, and we ended up with a few splashes of paint, but that’s what the muck mat is for.

One of L's marble paintings.

One of L’s marble paintings.

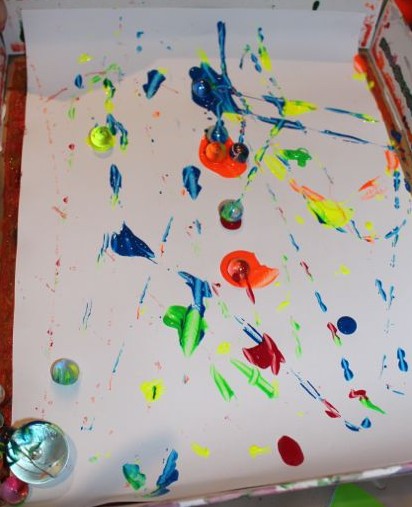
Once the marbles ran through the blobbed paint, they transported the paint all over the paper, making lovely patterns. As A had used so much paint, some of her marbles actually got stuck in the paint, and we had to push them along. It also meant that the paint colours mixed together and covered the paper, allowing the marbles to form tracks in the paint, rather than making tracks with the paint.

These are easy and fun paintings to do, and they look great!

A's paper with lots of paint.

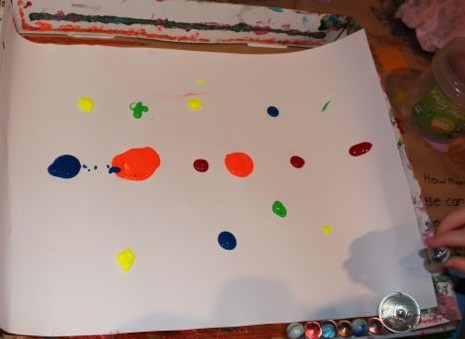
A’s paper with lots of paint.

A rolling her marbles through the paint.

A rolling her marbles through the paint.

More rolling marbles.

More rolling marbles.


A's finished marble track paintings.

A’s finished marble track paintings.