I love crafting with paper plates, they have so many uses 🙂 This time we used them to make fish. A whole plate for its body, and a quarter plate for its tail. I cut a triangle out of L’s for a mouth, but A decided to draw a mouth on for herself. The kids used collage materials and paint pens to decorate their fish. Once they were dry I punched a hole in the top of them so that we could attach some string and hang them up.
Tag Archives: craft
Jewellery Boxes
All our friends and family know how much we love doing craft, so the kids are often given craft kits as presents. This year for their birthdays the kids were both given a kit for making a jewellery box. L’s kit contained the box, along with some gel pens and stickers for decorating it. A’s kit was much more complicated, and involved actually building the box prior to painting and decorating it with glitter glue, rhinestones and stickers.
L got to work on hers, adding some stickers, and drawing on it. She decided that she would give the finished box to me, as she already has a lovely jewellery box, so she used alphabet stickers to put my name on it. She wrote some things on it like ‘I love you’ and ‘smiles on a rainy day’. She finished hers quite quickly.
There was no way A would have been able to glue her box together. It had almost thirty pieces, and it was a bit fiddly to get it together. The kit came with glue, but it wasn’t very good, and there wasn’t nearly enough of it, so I used PVA instead. I eventually finished gluing it (with much glue all over me too), and then we had to let it dry. A was quite impatient for it to dry. While we waited we checked out the paint pots that had come with the kit. The paint had dried out a lot, but I managed to revive it by adding some water to it. It was still a bit lumpy, but it was good enough to use. A got to painting the outside in different colours, and then painted the drawers as well. She did most of the painting, just asking me to smooth out the edges for her, and she seemed happy with the result.
Once the paint dried, A glued on some rhinestones to the drawer handles, and then put stickers on it. Lastly she added some glitter glue… and by some, I really mean a lot, all in one big blob on the top. We managed to spread it out, but it still took quite a while to dry. She was happy though. Now she is going to keep some of her play jewellery in it.
Egg Carton Caterpillars
This is a craft that gets done a lot at pre-schools and playgroups, but never seems to lose its appeal. In the past we have decorated these caterpillars with paint, textas, stickers, and gluing on bits of paper, cellophane and fabric. Sometimes they are short caterpillars and sometimes long, but always fun!
We had half an egg carton left over from some other craft, so I cut this in half to make two caterpillars for A. She chose to paint one green and one red. She put so much paint on them that it took all day to dry… Eventually we got back to them and A decorated them. I punched two holes with my awl in the head of each caterpillar so that A could add pipe-cleaner antennae. She also glued on some googly eyes, and then used pompoms to decorate their bodies. She gave the red one a pompom nose. They are very cute!
Threading Wall Decoration
Today we gathered together some dry pasta, cut-up straws, patty pan cases in two sizes, cotton balls and some string and set to work making a wall decoration for A’s room. I had some large plastic needles that A could safely use to thread her items onto the string. A cut quite a long piece of string so that it would stretch across her wall. I tied it off at the end so that the threaded items wouldn’t fall off the end, and then she got started. She used the point of the needle to push through the patty-pan cases and the cotton wool balls. The latter were reasonably hard to get the needle through, and she required some help with this, but she liked the way they looked once they were on the string.
She found that the straw pieces disappeared into the pasta if they were put together, so they were best separated by the patty-pan cases or the cotton wool. She had fun counting the straw pieces and pasta as she threaded them on too.
Once she was finished, I tied the string off, and we hung it up in her room. It was too heavy for blu-tack alone, so we tied one end to the curtain rod, and the opposite end to a hook that was already on the wall, with the centre section held up with bits of blu-tack at various intervals to give it a scalloped look. It brightened up her wall, and she had fun making it.
Egg Carton Spiders
We don’t normally do anything for Halloween, it’s not something we’ve really gotten into, but seeing all the decorations available in the shops put me in the mood for making some egg carton spiders. Luckily we have a large supply of egg cartons at the moment, so I pulled one out and cut it up into the individual cups.
The kids painted the egg cups inside and out with black paint (getting a lot on themselves in the process). We left these to dry for a while and then came back to add pipe-cleaner legs and googly eyes. I used an awl to punch the holes for the pipe-cleaner legs, making it easier for the kids to push the legs through. My awl is very sharp, and I didn’t allow the girls to touch it. A still had a lot of trouble putting legs on her spiders, so I helped her put them in and then shape them to give them knees and feet. L was able to put legs on her spiders and make them into a shape that she wanted.
A added some red paint to two of her spiders and told me they were red-backs, and one got a big red mouth. L preferred hers just black. I punched a hole into the top of each spider and added some string and then attached them to the ceiling with blu-tack.
Balloon Octopus
Making balloon octopuses (octopi?) is a quick and easy after school craft activity. All you need is some balloons, tape, crepe paper (or streamers or tissue paper) and permanent markers. I blew up a balloon for A, but L blew her own up, and tied it off. I added string to the knot so that the octopuses could be hung up.
They each cut up some crepe streamers into eight pieces for the tentacles (another opportunity to practice some counting!). Then they used tape to stick these on around the bottom of the balloon. A used the permanent markers to draw a face, including hair, ears and cheeks, while L covered her balloon in red spots, and told me it was a ‘red-ring octopus’. L also put some red spots on the tentacles. They had to be careful not to use too much pressure when drawing on the balloons so they didn’t pop. A glued a few pieces of pink tissue paper to the back of hers to make it pretty.
Once they were finished, I used blu-tack to stick the strings to the roof so that the tentacles hang down and swish in the breeze.
Flowers and Vase
Sometimes we pick flowers from the garden and bring them in to brighten up the dining room, but I always feel a little sad when they wilt and die. So we decided to make some flowers that wouldn’t die, along with a brightly coloured vase to put them in.
We used a tall, narrow cardboard box for the vase, as I just happened to have a very thick and sturdy box that was perfect for it. A clean tin would have worked equally as well. We started by ripping up some coloured paper into smallish pieces. Our paper was starry and we had the same starry print in four different colours, but any mix of colours or patterns could work. We used glue to paste the ripped up paper pieces on to the outside of the box, so that the surface was completely covered by overlapping the pieces in random order. We did this on each side of the box. L particularly liked ripping up the paper, and A was thrilled to use the glue.
I gave the kids two disposable plastic cups each and a pack of coloured permanent markers to make our flowers. I asked them to colour the cups in with whatever design they would like. Once they had finished their colouring, I cut the tops of the cups into strips, and bent them out to form the petals on our flowers. The edges of the cuts can be a bit sharp, so we had to be careful when handling the cups once I’d cut them. A coloured each of her petals in using all of the different coloured markers. Even though I put down newspaper to protect the paper, somehow L still managed to get blue permanent marker on the table… Big L poked a hole in the base of each cup, and I placed a green pipe cleaner through this hole, bending it down to form the flower stem, and then secured it with some tape on the base of the cup. This gave us four lovely flowers.
Our finished vase will live on our dining room table, and the kids are already planning to make some more flowers so we can change them over every now and again.
Headbands
A was given this craft kit for making headbands recently. She was very keen to have a go at it, so we set out all the contents on the table and talked about the design of the headbands. Since there were three headbands to decorate, A picked one, and offered to let L decorate one too. That left one, which A suggested I might like to make up…. and then she could wear my creation 🙂 I was very pleased that she was sharing so nicely with L.
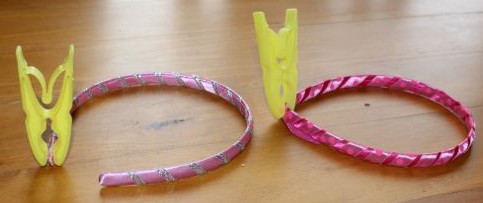
After much discussion about design, A insisted on making hers just like the one on the box. L just wanted the pink spotty ribbon and feathers on hers, and I got what was left. We started with the thin ribbons, which were meant to wrap around the plain satin headbands. The glue that came with the kit was terrible, so I used some silicone craft glue that we have for our craft projects. The kids found it difficult to wrap the ribbon around evenly, so I did that part for them.
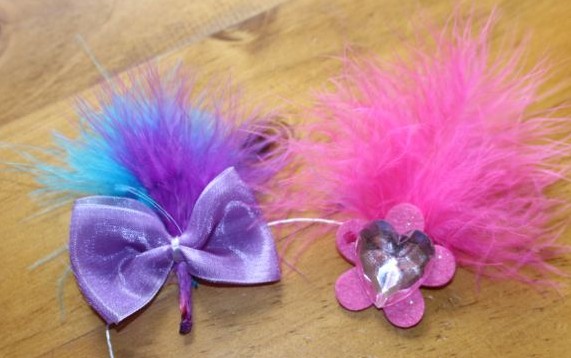
I helped A glue the heart crystal onto the pink flower along with a pink feather. Then I made a bow with the purple ribbon and glued some feathers to it. Once these were dry we stuck them onto the headbands.
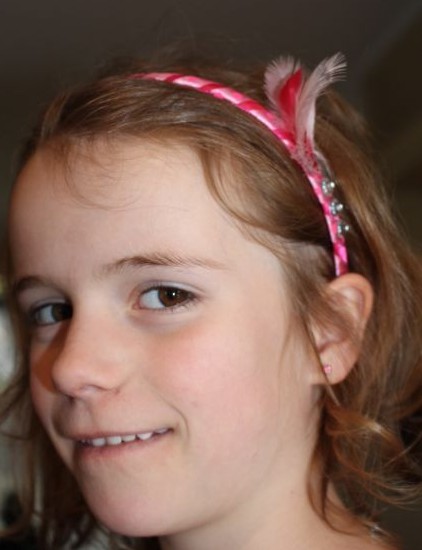
L used some little diamantes to decorate hers, along with some small feathers out of our craft box (the feather left in the craft kit was too big for what she wanted to do). I really like how hers turned out.
It took a little while for the headbands to dry, and the kids were not particularly patient during this time, but we got there eventually. They modeled the headbands for me, and they have been wearing them around a lot. I did most of the gluing in this activity as it was a bit fiddly to get the ribbon and the decorations onto the curved surface of the headband. Despite this, the kids really enjoyed designing and decorating, and then wearing the headbands. And we had some lovely time together whilst doing it.
Pipe-cleaners and Feathers
While I was looking for a bag of coloured feathers in one of the craft tubs I found a packet of metallic pipe-cleaners. I also found the bag of feathers I was actually looking for. The pipe-cleaners reminded me of Christmas, and Christmas is less than three months away now… I’ve already noticed Christmas things on display at the shops. Anyway, an idea for Christmas decorations came to mind using the pipe-cleaners.
We placed three pipe-cleaners together and twisted them in the centre to anchor them, and then fanned the six points out. Each of these six points were bent back onto themselves to create a star shape. Each piece was finished by twisting the ends of the pipe-cleaners around the middle. To hang them up, one of the star’s points could be used, or we added half a pipe-cleaner shaped into a hook on some of them.

I also made some tree shaped decorations using green, purple and gold pipe-cleaners, but these turned out to be too fiddly for the kids. 
The bag of feathers were also open on the table along with the pipe-cleaners. (And yes the kids had emptied both packets all over the table because that’s how craft supplies should be displayed for ease of locating just the right item among many similar or even identical items!) L started wrapping one of the pipe-cleaners around a feather, while A was attempting to string the feathers onto a pipe-cleaner. And so the next set of decorations came about. For these L and A picked out several feathers that they liked to go together, and I helped them wind a pipe-cleaner tightly around the end of the bunch of feathers several times. The end of the pipe-cleaner was shaped into a loop to hang them up.
Pet Rocks
“Can I have a puppy? Can I have a kitten? Can I have a pet bird, frog, fish, mouse…?” Sound familiar? Somewhere around the age of two or three these questions start like a childhood anthem. Kids just love pets, and we’re lucky enough to have a very fluffy cat as part of our family. But if it was left to the kids our cat would rarely be fed, watered or brushed, and his litter tray would never be cleaned out. Big L and I don’t mind doing these things to look after our furry friend, we like having a pet, and the kids are still learning about these responsibilities. But some friends of ours bought a cute little puppy a few months back, and now we are being asked for more pets. We’re not ready for more yet (and I think our cat would be hugely put-out if we brought home a dog!), so we decided to make some pet rocks. These are the kind of pets that don’t take up much room, and they don’t mind if you forget about them now and again.
We picked out a number of large smoothish rocks and pebbles from one of our garden beds to use for our pet rocks. The smoother the rock, the easier it was to paint. We used paint pens (by Crayola) for ease of painting. These are used like a pencil or crayon, making them easy for A, and give a quick dry, no drip paint experience. If we had used the craft paints we have the effect would have been more vivid, but it would have been messier. Since we were stuck inside due to the weather, the paint pens were a better choice for us on the day. I would like to make some more with other paints outside another day for a different look.
Once the paint was dry we stuck on googly eyes and used felt scraps and wool scraps to give them some personality. The felt was great for ears and tails. L also used some mini popsticks to glue onto one of hers for legs. She tried gluing some of the rocks together to make bigger pet rocks, but it took ages for the glue to dry, and it was hard to get them to stick together well.


