Tag Archives: christmas trees

Fingerprint Christmas Cards

Standard

IMG_3042IMG_3040


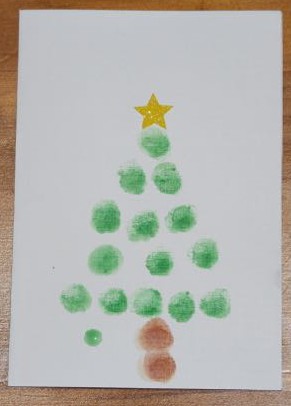
There were Christmas craft ideas in some of the email newsletters from Educational Experience in the lead up to Christmas. One of the ideas was to create fingerprint Christmas cards. We tried this out at home, making Christmas trees and candy canes with our fingers.

A liked to smudge her fingerprints together for her trees.

A liked to smudge her fingerprints together for her trees.

L carefully creating a tree.

L carefully creating a tree.

We started with plain white cards. The kids used green paint to create a triangle for the tree, and then brown paint for the trunk. The candy canes were alternating red and white fingerprints in a cane shape.

A making a candy cane.

A making a candy cane.

To finish the cards, we added sparkly star stickers to the top of the trees, and little Christmas stickers in the corners of the candy cane cards.

This was a quick activity with minimal mess. And the end result looked good. We gave these cards to teachers and staff at the kids’ school. The card’s recipients were very impressed. On the back of each card I wrote the name of the child that painted the card, along with the year and the class that the kids were in.

Advertisement

Ice-cream Cone Christmas Trees

Standard

IMG_2719

Waffle cones pre-cutting.

Waffle cones pre-cutting.

I saw this recipe on The Organised Housewife last week, and thought it looked like a quick and easy Christmas food idea. I went to gather our ingredients, but our local grocery store didn’t have any normal pointy ice-cream cones! They had plenty of flat bottomed cones, and waffle cones. I’d already told the kids I had a Christmas activity in mind for after dinner, and I didn’t have time (or the desire) to drive elsewhere to find the cones, so we went with waffle cones.

After cutting.

After cutting.

These could have made some very wonky Christmas trees, so I carefully cut off excess cone using a knife, so that when the cones were turned upside down they sat on a plate without falling over. The bits of cone that I cut off, Big L ate with ice-cream, buttercream, Nutella and sprinkles later.

Icing the cone.

Icing the cone.

Adding sprinkles.

Adding sprinkles.

L helped me to make up a portion of light green buttercream, which we used to cover the cones with. Then we added red and green m&ms, pastel coloured sprinkles and mini m&ms. The kids added jelly babies to the top point of their trees at the star/angel.

Carefully placing m&ms.

Carefully placing m&ms.

This was fun, messy and very sweet, but a great activity around Christmas time.


IMG_2712

Christmas Trees

Standard

IMG_4030These Christmas tree shapes were in the Christmas bags from Riot Art & Craft, along with a container of Christmas card embellishments. The trees were a thin foam, and there were three each to decorate.

Foam tree shapes.

Foam tree shapes.

Embellishment pack.

Embellishment pack.


Some of the embellishments had paper backing that could be removed to reveal a sticky side to stick straight onto the tree or card. These bits of paper were very hard to remove, and in some cases, we actually pulled the sticky backing right off the embellishment along with the paper. After that we just used craft glue to stick the embellishments onto the trees.

Adding glitter glue.

Adding glitter glue.

Glitter glue in gold and silver added a final touch of sparkle to these great Christmas trees.


IMG_4003

A’s trees.

L's trees.

L’s trees.


Once they were dry we used blu-tack to stick them on our front door.

Pipe-cleaners and Feathers

Standard

While I was looking for a bag of coloured feathers in one of the craft tubs I found a packet of metallic pipe-cleaners. I also found the bag of feathers I was actually looking for. The pipe-cleaners reminded me of Christmas, and Christmas is less than three months away now… I’ve already noticed Christmas things on display at the shops. Anyway, an idea for Christmas decorations came to mind using the pipe-cleaners.

We placed three pipe-cleaners together and twisted them in the centre to anchor them, and then fanned the six points out. Each of these six points were bent back onto themselves to create a star shape. Each piece was finished by twisting the ends of the pipe-cleaners around the middle. To hang them up, one of the star’s points could be used, or we added half a pipe-cleaner shaped into a hook on some of them.

IMG_2754IMG_2760I also made some tree shaped decorations using green, purple and gold pipe-cleaners, but these turned out to be too fiddly for the kids. IMG_2757

The bag of feathers were also open on the table along with the pipe-cleaners. (And yes the kids had emptied both packets all over the table because that’s how craft supplies should be displayed for ease of locating just the right item among many similar or even identical items!) L started wrapping one of the pipe-cleaners around a feather, while A was attempting to string the feathers onto a pipe-cleaner. And so the next set of decorations came about. For these L and A picked out several feathers that they liked to go together, and I helped them wind a pipe-cleaner tightly around the end of the bunch of feathers several times. The end of the pipe-cleaner was shaped into a loop to hang them up.

Feather and pipe-cleaner decorations.

Feather and pipe-cleaner decorations.