Tag Archives: craft kit

Foam Christmas Spoons

Standard

IMG_2860
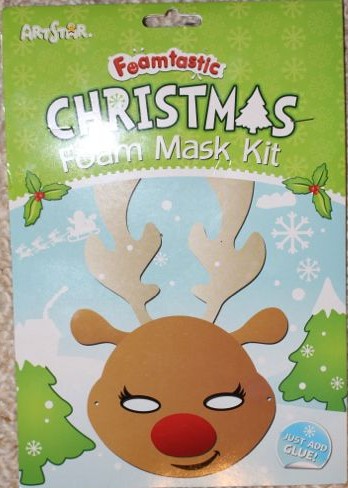
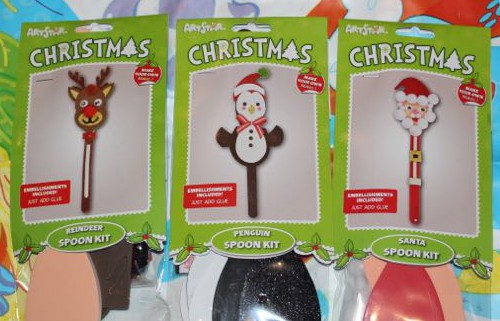
A found these foam spoon kits in Riot Art & Craft last week. She picked out two for her and two for L (who was not with us at the time). They were only a couple of dollars each, and they gave us an hour or so of Christmas crafting fun.

Each pack contained a foam spoon and all the bits to attach to the spoon to make a penguin, Santa or reindeer.

Sticking on the reindeer's head.

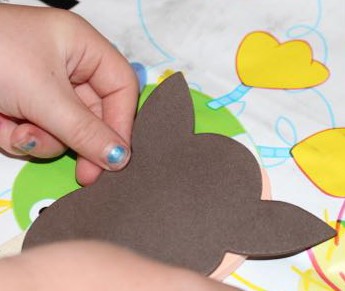
Sticking on the reindeer’s head.

The penguin packs had foam with a sticky backing so all we had to do was peel off the backing paper, and stick it where it had to go. The only problem with this was that the sticky area of the body pieces were much wider than the spoon, leaving the back of the body with nothing to stick to. The reindeer and Santa packs weren’t self-sticking, so we used craft glue to attach the foam pieces to the spoon.

Placing tiny bells on the reindeer's antlers.

Placing tiny bells on the reindeer’s antlers.

L and A very carefully followed the pictures to create their spoons. For some reason A’s penguin pack had two wings the same, instead of a left and right wing! She didn’t really care though, she just stuck the second wing on upside down and told me the penguin was waving.

Sticking on the penguin's beak.

Sticking on the penguin’s beak.

We have displayed these Christmas spoons up on the wall. They are very cute!


IMG_2875

Advertisement

Felt Christmas Tree Decorations

Standard

IMG_2671

IMG_2659I was browsing in Riot Art & Craft the other day and we came across these little felt decoration kits. They looked like fun, so I bought two.

Sorted and ready to go.

Sorted and ready to go.

The circles came pre-punched in felt rectangles, so the kids popped them all out then put the scraps in the bin. Once we’d sorted the circles into piles of different sizes, I noticed that we were short a few circles, and the kids had to go and get them from the bin (luckily they were in a new bin bag so there wasn’t anything yucky in there!). We sorted the piles from biggest to smallest to make it easier to pick up the right sized circles.

Threading the felt circles.

Threading the felt circles.

We tied knots in the end of the silver string and threaded the plastic needles. Then the kids got to work, first adding the cylindrical bead for the tree trunk, and then the felt circles in descending order and finally the star bead. This was where it got a little tricky however, because then the instructions suggested making a loop and taking the thread back through the beads and circles to tie it off at the base where we started. I had to help the kids do this, and the star bead mostly popped off when we tried to tie the thread at the opposite end. The star was easy to thread back on, and then I added a knot above it to stop it slipping off again.

I have added a drop of craft glue to the bottom of the trunk bead and the top of the star bead to prevent the thread pulling through in the future. And I trimmed the end of the thread ready to hang on the Christmas tree.

L (7 years) found this an easy and enjoyable activity that she could complete herself. On the other hand, A (5 years), had more difficulties and required more help with tying the knots and getting the thread back through everything. Putting on the beads and felt circles was easy enough, but she kept letting the thread go, and she had trouble re-threading the needle. A made several trees with help, and still enjoyed it, but L could have done this as a solo activity.

IMG_2672

Sand in a Bottle

Standard

IMG_9460I had been sourcing supplies to try layering coloured sand in bottles, when I saw this kit advertised in the Scholastic Book Club (Australia). It was a good opportunity for the kids to try this craft activity on a small scale. The kit came with small bags of coloured sand, plastic bottles and stoppers, a little funnel and a styling stick. The sand was purple, orange, blue, pink and yellow.

Some of the bags of sand.

Some of the bags of sand.

Pouring sand.

Pouring sand.

Each of the kids picked a bottle and got started. Surprisingly we had very few spills of sand, and the kids were very careful pouring it into the funnel. They even took turns using the funnel to pour sand into their bottles. It was nice to see them sharing.

L's bottle.

L’s bottle.

A’s first bottle was very tall and skinny, so it didn’t take much sand to make thick layers. L made her layers reasonably flat, while A liked her layers to be angled. They were unable to use the styling stick on these bottles, as the shape of them prevented the stick getting to the edge to push the sand down.

Using the styling stick.

Using the styling stick.

A's second bottle.

A’s second bottle.

A filled another bottle and we were able to use the styling stick in this one as the sides were straight and flat. A would pour a few layers, and then scrape the stick down the inside to push some of the sand down through the layers, forming unique variations in the layers. This looked really good.

Once the bottles were filled, we placed a stopper in the top to prevent the sand escaping. The sand settled a little too. Then they were ready to be displayed.

This was a fun activity, and the kids really liked it. The only disappointing thing was that the plastic of the bottles wasn’t as clear as glass would have been. As we poured the sand into the bottle some coloured dust stuck to the inside of the bottles dulling the colours a bit. This was a fairly minor issue though, and it didn’t detract from the fun of filling the bottles with sand.

I would like to try this activity again using glass bottles and other colours of sand. The layers of sand in the bottles look fantastic displayed on our shelf.

IMG_9454


Pom Pom Bunnies and Chicks

Standard


IMG_8836When we went into Riot Art & Craft last week they had a large display of Easter crafts, including some little craft kits. Each of the kids picked out a pom pom critter kit to make at home. L chose mini chicks and bunnies, and A chose some chicks.

IMG_8818IMG_8819There were some instructions on the back of the pack, but it would have been possible to complete the pom pom critters from the picture alone, given what was in each kit. We had to cut up some of the pipe cleaners to the right length, but otherwise everything was ready to go.


Adding the chick's bunny ears headband.

Adding the chick’s bunny ears headband.

L got started on hers straight away, getting the beak and little puffy cheeks onto her chicks. A asked that I help her with the glue, and making the pipe cleaners into the right shapes. Once I’d placed the glue, she put the pieces together carefully.

One of L’s mini bunnies experienced a small accident which left its face elongated, so L started calling it the ele-bunny. I think she just damaged the pom pom, making it a weird shape.

L's mini bunnies and mini chicks.

L’s mini bunnies and mini chicks.

It was a fun way to pass an hour or so, and once the pom pom critters dried, the kids had great fun playing with them. A even took her chicks to bed with her and cuddled them to sleep.

IMG_8850


Snowman Hand Puppet

Standard

IMG_4234L has been interested in doing some basic sewing of late, so when she picked out her little Christmas kit at Riot Art & Craft, she chose one that involved sewing a felt snowman together. The kit was to make a snowman hand puppet out of felt, and then decorate it as shown in the picture. This was a very easy activity for L, and she completed it quite quickly.

The felt pieces had little holes around the edges for the plastic needle to pass through. L asked me to tie a knot in the yarn at the start, and then she stitched around the edges of the snowman, making sure she didn’t miss any of the holes, and then I tied it off at the end. She got the yarn tangled a couple of times, but it was easy enough to undo and then continue stitching.

Finished sewing.

Finished sewing.

One of the things my kids like about doing craft is that so many craft activities require the use of glue, and this was no exception. Out comes the craft glue, and L was all ready to start gluing on the decorations straight away. I convinced her to put down the glue and lay out the decorations where she wanted them first, to see what it would look like before actually attaching them. Having a plan of action is normally a good thing when crafting 🙂

Adding stars to the scarf.

Adding stars to the scarf.

Gluing on the hat's pom pom.

Gluing on the hat’s pom pom.


Once the adornments were glued down, L was very happy with the result, and rather impatient for it to dry! Finally it was dry, and she was able to use it as a puppet. This was a fairly cheap craft kit that has provided L with lots of amusement.

Ready to play with.

Ready to play with.

Reindeer Foam Mask

Standard

IMG_4017While we were in Riot Art and Craft, the kids each chose a small Christmas craft kit. A picked out this reindeer foam mask, and L got a snowman hand puppet.

We opened the pack and tipped out all the pieces. For some reason there was no piece for the mouth in our pack. Luckily the pieces of foam from where the eye holes are cut out were in the pack, and we were able to cut one of these to make a mouth. A used some glue to stick on the nose, mouth and eye-lashes. Then when that was dry, we turned it over, and stuck on the ears and the antlers. It used a couple of pop-sticks to keep the antlers up straight, and a piece of elastic to hold it on the face.

It was very easy for A to make this mask, and she has been having lots of fun wearing it around. She loves her dress-ups, and it has been a fun addition to her wardrobe.

A wearing her new reindeer mask.

A wearing her new reindeer mask.

Riot Art & Craft Christmas Showbag

Standard

I took the kids into Riot Art & Craft looking for some Christmas craft items. They had plenty of things that we could use, and we picked out some foam balls, sequins, glitter glue, and Christmas ribbons. But our best find was the Christmas Showbags which contain a variety of Christmas craft items worth over $40 (according to the label). These bags were on sale for only $15, so L and A got one each.

IMG_3973

I was quite impressed with the contents. Each one contained acrylic paint pots, sequins, four 3D foam shapes, including a wreath, glue, glitter glue, felt, foam tree shapes, Christmas stickers, a Christmas embellishment pack, metallic holly shapes, blank cards, cardboard ornament shapes, bauble and snowflake garlands and 3D cardboard reindeer. This was plenty for us to get on with our Christmas crafting, and we have put some of the items to good use already!

Showbag contents.

Showbag contents.

The bag also has a template for making a reindeer puppet too. We could cut out the template, glue it together and decorate it, but we have lots of other craft to do before we get to that 🙂

Plaster Christmas Decorations

Standard
Christmas decoration kits, one boot and one angel.

Christmas decoration kits, one boot and one angel.

I picked up these little plaster decoration kits at Coles whilst doing the grocery shopping last week. The kids picked one each, and sat down to paint them yesterday. Each kit came with a little paintbrush and three paint pots in the primary colours. I suggested they could mix the colours to form new colours. They did a little bit of colour mixing, but mostly they just wanted to paint with the colours they were given.

A painting her decoration.

A painting her decoration.

L painting her angel.

L painting her angel.


They had fun painting these decorations, and can’t wait to hang them up on the Christmas tree. Until then, A has hung hers up above her bed because she likes it so much 🙂

IMG_3684


Crown Door Sign

Standard

IMG_3608This was another craft kit that was given to L for her birthday this year. There were a few bits to glue together, but most of it was painting and decorating.

The paints that came with the kit were pinks and purples, but unfortunately they had dried out so much that I was unable to revive them. So I grabbed out some paint from our paint supplies,

Painting.

Painting.

and let L pick whatever colours she wanted. L has recently decided that her favourite colour is no longer pink, so she chose blue, white, yellow and orange to paint with instead. She did get a little paint on the whiteboard section, but it was easy to wipe off with a damp cloth.


Adding shapes to the crown.

Adding shapes to the crown.

The hardest part for L to do was getting the little sliding panel on. It required the small panel to be placed between the runners just so, for it to be able to slide and not fall out of the grooves. Under the panel she could place stickers from the kit, one says ‘I don’t want to be bothered now’ and the other says ‘Come in and visit me’. L can slide the panel across to display only the one she wants to show.

Decorating.

Decorating.

There were some little wooden shapes in the kit for decoration. L painted these and glued them on. Then she added some glitter glue, rhinestones and stickers to finish the crown off. The kit came with a pink feathery string to add to the crown’s points (you can see it on the box), but L decided it didn’t suit her blue and orange crown, so she saved it for another day.

It had a little whiteboard piece in the centre of the crown to write something on. L wrote her name on this bit before hanging it on her door.

Ready for L to write her name on and hang it up.

Ready for L to write her name on and hang it up.