Category Archives: Craft

Pom Pom Monsters

Standard

IMG_8395

I put out a tray of pom poms, a tub of googly eyes and some glue, and let the kids’ imaginations go wild making monsters.

I thought these were arms, but A told me they are monster ears.

I thought these were arms, but A told me they are monster ears.

L made a very elaborate monster using lots of pom poms. She did all the gluing and construction herself, while A needed some help with the glue. L managed to stick one of the pom poms to her finger, and another to the table though, so perhaps she also would have benefited from some help with the glue!

L's monster nurse.

L’s monster nurse.

When L had finished her monster, I asked about her monster’s head. I though the white pom pom with small red pompoms between its black horns, was its brain outside its body. I couldn’t have been more wrong, it is actually a nurse’s hat, as her monster is a monster nurse.

One-eyed worm monster.

One-eyed worm monster.

A’s first monster had two big fat legs, a head, and big ears. She gave it one big eye on the middle of its head. Her second monster also had only one big eye, so to make up for this, her third monster was covered in eyes. It even has an eye on each of its four legs, and eyes able to look in every directions around its body. A named this last monster ’20 Eyes’.

20 Eyes the monster. There are more eyes on the other side too.

20 Eyes the monster. There are more eyes on the other side too.

Melty Beads Bookmarks

Standard

IMG_8039All of us are guilty of reading several books at once, leaving bookmarks in them, and forgetting to replace our bookmarks when we are done. L made a lovely bookmark holder out of pop-sticks a couple of weeks ago which is helping us to keep our bookmarks together, but we could do with some more to add to our collection. We were browsing through a Hama Beads Inspiration booklet when we saw some bookmarks made from the beads and some ribbon. We decided to have a go at making some bookmarks like this, though we made up our own bead designs.

IMG_8035

L made this design on our penguin pegboard.

L made this design on our penguin pegboard.

Each of our designs included a hole for the ribbon to be attached, and we tried not to make them too big or they would have been too heavy to stay in the book. Since each one wasn’t very big, we used a few of the smaller pegboards to create them.

IMG_8038I ironed the beads together and when they were cool we threaded some ribbon through the hole we’d left, and tied it off. We made the ribbon long enough that it would lie right along the height of our books and poke out the bottom.

These make for some very cute little bookmarks, and they were really easy to make. L particularly liked that she could make any shape or design she liked with any colours.

L's new bookmark in one of our books.

L’s new bookmark in one of our books.

IMG_8036

Melty Beads Bag Tags

Standard

IMG_8173When L was a preschooler her teacher noticed that while she was advanced in many areas, her fine motor skills could use some improvement. The school gave me some ideas for things to practice with her to improve her fine motor skills to help improve her writing. One of their suggestions was melty beads, which I found under the brand name Hama Beads in Lincraft. These are little plastic ring-like beads that are placed on a peg board in the desired design and then the top is ironed to melt the beads together (with baking paper between the beads and the iron face to prevent the beads melting onto the iron!). Then once the beads cool down, the design can be removed from the peg board and displayed or used in whatever way one wishes. These melty beads were a huge hit with L. We have done many designs over the past couple of years, and it never seems to lose its appeal. Now A is also very interested in making designs with the melty beads.

L adding beads to her star peg board.

L adding beads to her star peg board.

Yesterday we used our melty beads to make some bag tags. A chose to make her bag tag in a heart shape, while L picked to use the star peg board. There are many different shaped peg boards available, and we only have a small selection. There are also lots of different coloured beads, which can be purchased as individual colours, or in various mixed packs. I have always bought  sets of mixed beads for variety, and L and A mostly like to place the coloured beads randomly onto their chosen shape.

A placing beads on her peg board.

A placing beads on her peg board.

As predicted, A made her two hearts in a completely random way, though L made some patterns on her stars. I wielded the iron as it is too dangerous for the kids to touch.

A's hearts.

A’s hearts.

L's stars.

L’s stars.


I used a hot glue gun to attach a piece of ribbon to the back of one of the shapes to form a loop from which the tag could be hung. Continuing with the glue gun, I stuck the second shape back-to-back with the first shape, so that the ribbon was sandwiched between them. A’s two hearts went together nicely, and L asked to have her stars placed so that the points of one were between the points of the other. She thought this looked cool. The glue doesn’t take long to dry, so shortly after finishing the kids could attach their new tags to their bags.

We didn’t write their names on these tags, but they do help the kids to identify their own bag at school.

New bag tag hanging on A's backpack.

New bag tag hanging on A’s backpack.

L's new bag tag hanging from the handle of her backpack.

L’s new bag tag hanging from the handle of her backpack.

Pop-stick Bookmark Holder

Standard

Books are one of my family’s greatest loves. We have them packed into shelves, stacked around on tables, chairs, and on any available flat surface, and A has been known to sleep with a book or two under her pillow. We buy more books every year and we frequent the public library, which allows us to borrow an unlimited amount of items and they’ve done away with over-due fees! So you can imagine how many books we read every year between us, and many of them are too long to be read in one sitting, however much we might want to read them to the end. I will use just about anything on hand as a bookmark, scraps of paper, lolly wrappers, hair clips, business cards, pencils…. and I’ve found L using another book as a bookmark a few times. This is not due to lack of ownership of proper bookmarks, but we just never seem to be able to find one when we need it, or they are already in a book (I’m particularly bad at having multiple books on the run at the same time). Big L often shakes his head when he sees me using some unusual object as a bookmark. We really needed a place that was dedicated to storing bookmarks, somewhere that we could find a bookmark when we needed one, and replace it there when we were finished, all ready for the next book.

Bookmark holder full of bookmarks.

Bookmark holder full of bookmarks.

L built us a bookmark holder out of pop-sticks. She started with a base of pop-sticks, and then built it up from there. She used PVA glue to stick the pop-sticks together, working around in a square pattern. I helped a little with the glue and adding some of the pop-sticks, under L’s directions. When L was using the glue, she often added so much to the corners that it squished out the sides, so I don’t think it will ever come apart! L kept adding pop-sticks until the holder was a good height. To finish it off, she used some mini pop-sticks and match-sticks to decorate the top layer. I added a couple more pop-sticks to the bottom of the base to prevent any of the thin bookmarks slipping there the small gaps between the pop-sticks.

Creating a base.

Creating a base.

Adding glue.

Adding glue.


Building up the sides.

Building up the sides.

Drying.

Drying.

It took a long time to dry, but it’s very solid! We have put as many bookmarks as we could find into the holder, and placed it on one of L’s shelves. Hopefully we will manage to keep putting our bookmarks back in between uses 🙂

Paper Plate Aquarium

Standard

Both L and A have been fascinated by the ocean and its inhabitants for a while now. They want to read books on ocean creatures, watch ocean documentaries, do sea creature craft, and watch The Little Mermaid and Finding Nemo over and over and over…  They also want some pet fish, but we just don’t have a good place where we could keep a fish tank at the moment, not with Baby T learning to climb on everything and pull things over. We improvised instead, and made some little aquariums using paper plates to hang in their rooms.

L's aquarium.

L’s aquarium.

Painting the plate blue.

Painting the plate blue.

First, the kids painted one of the plates blue to represent the water in their aquariums. This was fairly quick, but of course, we had to wait until they were dry. While that happened, the kids started colouring in their sea creatures with markers. L only coloured in a few of her creatures, as she only wanted to make one aquarium, but as A wanted to make two, she coloured all of hers in. I found the undersea creatures to colour in on the Crayola site. There are lots of colouring pages available to print there.

Colouring in.

Colouring in.

L cutting out her fish.

L cutting out her fish.

L only needed a little bit of help cutting her sea creatures out, but A asked me to do hers after she almost cut off the fish’s head. We used crepe paper to make sea weed, I just cut a few different green shades and some brown into strips. The kids glued some seaweed on, and then added their sea creatures. They both added some more strips of seaweed after this, making some of the animals appear to be hiding in the sea weed. This was their idea, and I love it.

Adding sea weed.

Adding sea weed.

Gluing on sea creatures.

Gluing on sea creatures.


I made the lids for the aquariums using a second paper plate. I cut the centre out, leaving just the ridged bit around the edge. Then I taped some plastic cling wrap over the plate, creating a clear cover for the aquarium. We stuck the two paper plates together at the edges using tape, added some string to the top of each aquarium and hung them up.

A's aquariums.

A’s aquariums.

Plaster Hand-Prints

Standard

I like the idea of having little mementos of our children’s childhoods. They each have a box of things that we can show them when they are older, such as the hospital tags from when they were born, favourite baby toys, newborn clothing, and as they get older, certificates, special drawings and some school things. Having hand and foot prints of our children have been a nice addition to their boxes, as we can look back at how small they were.  I wanted something that we could display (aside from photographs), and making hand prints in plaster was the perfect solution. IMG_7806

I bought a box of plaster-of-paris, and mixed it according to the directions on the pack. We used some small plastic plates as our moulds, into which I poured the plaster mixture to fill the plate about three-quarters full.

Box of plaster-of-paris.

Plaster-of-paris.

Plate of wet plaster.

I’d made it a little runnier than necessary, so we waited for it to thicken a little before each of the kids placed their hand, palm down, into one of the plates. I used Baby T’s foot instead of his hand, as I thought he would probably just scrunch his fingers up in the plaster, and we wouldn’t get much of an impression. L and A held their hands in the plaster for about a minute before carefully lifting them out, leaving behind their hand print. I held Baby T’s foot in the plaster while he sat in the high chair, he was not overly impressed by this. It was very easy to wash the plaster off their skin once the impressions were made.

Impression in the wet plaster.

Impression in the wet plaster.

We left the plaster to dry for several hours before checking them. They seemed fairly dry, but I left them overnight to dry completely before removing them from the plates. They slipped out of the plates very easily.

Impressions in the dried plaster.

Impressions in the dried plaster.


Once dry, I painted each impression with silver acrylic paint, and then the surrounds with gold acrylic paint. I did a couple of coats to make the metallic colour brighter. I left them to dry overnight, and then I added their name and the date in black acrylic to each one. I’m still deciding whether to add some spray gloss to them. I think it might be a good idea to help protect them, but I have to go and find where the gloss was stashed after our last project to use it.

Painted foot print.

Painted foot print.

Starry Stars

Standard

The kids really like stars. I think their two favourite shapes at the moment are stars and love hearts. L, in particular, is going through a stage of drawing love hearts and stars on everything. So a simple post-dinner activity was placing star stickers onto a cardboard star.

IMG_7594

I drew the stars on a sheet of cardboard and cut them out, then I let the kids loose with two star shapes each, and several sheets of star stickers. A placed random stars all over hers, while L used the stars to make patterns, and even a face on one cardboard star. She also layered some of the stickers to make some stars with lots of points.

A placing star stickers.

A placing star stickers.

One of L's multi-stickered stars.

One of L’s multi-stickered stars.


Once they were finished placing stickers, we taped some thick pink paper strips to the top of the stars to hang them by.


You may also like Sticker Names and Sticker Counting.

Animal Magnets

Standard
Lots of spare animal cards.

Lots of spare animal cards.

Last year Woolworths wowed all the kids with their Aussie Animal Cards to collect. And then came the baby wildlife Aussie Animal Cards just before Christmas. L and A got to collecting them, and filling up their albums, but they were left with lots of spares. When the promotion finished, we didn’t quite have the full set. Our friends were very generous in giving us their spares to try to complete our sets, and now I think we are only short one card. However, there is a huge stack of spares left, and most people we know already have a full set, and still have spares. The kids like looking through all the spares, but I thought they might be able to be put them to a better use.

I received a new laminator for Christmas, and I was keen to try it out. L picked out five of the Aussie Animal Cards, and I placed them into an A4 laminating pouch and laminated them. I cut around each card, making sure there were no pointy corners. We glued some magnets to the back of each one. We tried some of the magnets at the top of the card, and some in the centre, both worked well.

Laminating the cards.

Laminating the cards.

Adding magnets.

Adding magnets.


Once the glue was dry we put our new animal magnets onto the front of the fridge.

Lined up on our fridge.

Lined up on our fridge.

Jelly-fish

Standard

IMG_4769These wonderful jelly-fish were made using a paper bowl and scraps of various yarns, cotton, and ribbons. The ribbons were all collected from gifts we had been given for birthdays last year and were just sitting in the craft box awaiting their final purpose. It’s great when we can re-use something like that in our craft pursuits.

IMG_4754

Painting the top of the jelly-fish.

We ended up making three jelly-fish. First we painted the bowls, L picked orange, A picked blue and purple. I ended up finishing off the purple one though, as A got a bit tired of using the tiny detail brush she’d decided to paint with. She chose a much thicker brush for the blue paint, which allowed her to paint the bowl more quickly and easily.

While the bowls dried we sorted out our tentacles. I thought the jelly-fish would look better with tentacles of varying lengths, so I wasn’t very particular about the length of the pieces as I cut them up. I placed the tentacles into two piles, one for each child, so that they each had a range of different tentacles to choose from. I ended up needing to cut more yarn up as we ran out before we had finished. Some of the yarn was feathers, and some was a powderpuff yarn that was fluffy. I thought these yarns looked really good on the jelly-fish, and it gave them a bit more variety and texture, than if we’d just used plain yarns.

Taping on tentacles.

Taping on tentacles.


Attaching tentacles.

Attaching tentacles.


To stick the tentacles onto the bowl, we used sticky tape. The kids made bundles of several tentacle pieces together in some sticky tape, and then they taped that to the inside edge of the bowl. I found that it was easiest to use a longer length of tape, stick the tops of the tentacles along it, and then fold it over to form a rectangle of tape housing a number of tentacles, and then tape that section into the bowl. We continued doing this all the way around the edge of the bowl to give the jelly-fish a good coverage of tentacles.


Decorating with markers.

Decorating with markers.

L and A used some permanent markers to decorate the top of their jelly-fish. We also stuck on some googly eyes to the side of the bowl.

We hung the jelly-fish up in their rooms, and they look great with their tentacles wafting about in the breeze.

IMG_4871

Box Construction City

Standard

Over the last few months we have been collecting cardboard boxes instead of recycling them straight away. There were also a number of box construction items that had come home from school, and were added to the pile for re-purposing. The pile of boxes grew and grew, until it was taking up plenty of valuable decking real estate. There were a lot of cardboard boxes, of all shapes and sizes, from jelly crystal and bikkie boxes, through to nappy and big packing or freight boxes.

IMG_4715

And what would we do with so many boxes? Well, the answer to that is Boxtown! The end of our deck was transformed into a city this morning by L, A, Big L and myself. Baby T wanted to help, but it was nap time, so he flew off to dreamworld while the rest of us got our builders’ hats on.

Building the library.

Building the library.

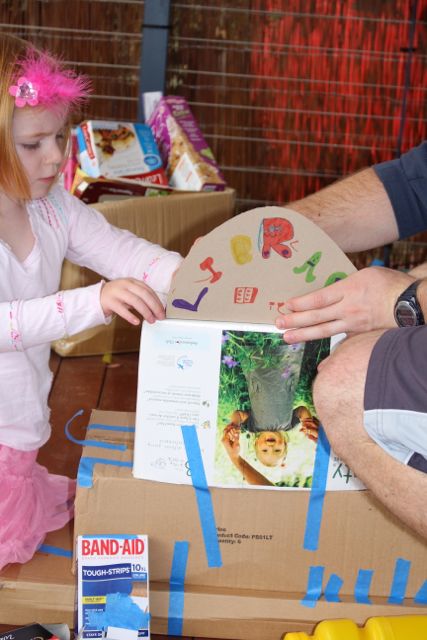
The first large building to be built was a library (I think this must be a reflection of how much we like to read!). L made a lovely sign for the top of it, and both kids helped me tape the boxes together. A tried to attach a thin cracker box as a walkway to another building, but she never made the other building to attach it to, so it just stuck out at the side of the library. Well, at least it did until it fell off, and A didn’t notice, so I didn’t mention it.


Hospital with chopper on the heli-pad.

Hospital with chopper on the heli-pad.

There was also a hospital, complete with heli-pad and helicopter. The helicopter even had a red cross on its side and rotors that could spin. Besides the hospital was an airport and runway made out of painters tape. L made some planes out of cardboard rolls to live at the airport.


Airport and runway.

Airport and runway.

There were other small buildings too, including a dental clinic made from toothpaste boxes, a restaurant made from a yoghurt container, and a doctor’s surgery made from bandaid boxes. These were chosen and made entirely by L, who sorted through the boxes until she found the appropriate ones 🙂

Office tower.

Office tower.

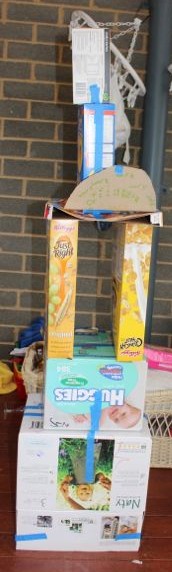
The biggest building in Boxtown  was the office block. Big L helped the kids make it so big, it actually stood taller than L. It was a large skyscraper towering over the rest of Boxtown. A used markers to draw some windows and doors, and make it “pretty”, while L made a sign for it. She wrote the word ‘work’ all over the sign so we had no doubt what was supposed to occur inside the office block, though she made no suggestion as to what work her workers would be performing.

There were also a few houses. A decorated a shoe box, giving it some chimneys and windows, which I think was a house. L made a large dog house too.

This was several hours of building fun, and then some more fun playing in the city. And once the kids have finished playing with Boxtown we will recycle it and reclaim our deck 🙂