Category Archives: Fine Motor Skills

Button Rainbow

Standard

IMG_0240

Feeling the buttons.

Feeling the buttons.

A made another rainbow today, this time using buttons. We have a big jar of old or odd buttons that are great for crafting with. A tipped the jar all over the mat, and enjoyed running her fingers through the buttons. She looked for unique or special buttons, such as shiny ones or particularly large ones.

Sorting into colours.

Sorting into colours.

She sorted the buttons into piles of like colours in preparation for making her rainbow. This was a good sorting activity for A, where she sometimes had to decide what colour a particular button was. For example, she had to decide whether some of the buttons were more orange and should go in the orange pile, or were they more red and go in the red pile. Picking up the buttons and placing them was also good for her fine motor skills.

Placing the buttons.

Placing the buttons.

A laid out the buttons on a piece of paper to form her rainbow. She started with the green buttons on the bottom because green was the least numerous colour, which she could tell from the size of the pile. Then she worked her way out through the colours. She didn’t glue the buttons down though, so she could reuse them for something else later.

Once A was finished, she packed up all of the buttons very carefully back into their jar.

Mosaics Rainbow

Standard

IMG_9989

This rainbow was made using cardboard mosaic squares. A made arches of glue and then placed the squares onto the glue to create the rainbow. It took a while for her to do this, but I think it is a lovely rainbow.

Placing mosaic squares.

Placing mosaic squares.

This turned out to be an excellent activity for A’s fine motor skills, as she had to pick up a single mosaic square, and then carefully place it where she wanted it. Sometimes she had to lift a square up and place it down again if she missed, or move them about in the glue to get them into position. She was getting a bit tired towards the end of the rainbow, and I helped her finish the last arch of red squares.

Sticking on some clouds.

Sticking on some clouds.

A chose to make clouds using cotton balls. She packed the cotton balls in so the clouds are very fluffy.

When it dried, the paper under the rainbow became a bit crinkly where the glue had dried. As is A’s tendency, she did use rather a lot of glue, but it looks fine on the wall next to some of her other rainbow pictures.

Pipe Cleaner Rainbow

Standard

IMG_9991

Placing the pipe cleaners.

Placing the pipe cleaners.

Another rainbow made by A. This time she glued pipe cleaners onto some paper to form a rainbow. She chose the order of the colours, and I helped by applying craft glue (the bottle is almost empty). A bent all the pipe cleaners into arches herself. When she was finished placing the pipe cleaners, I used sharp scissors to cut the bottoms of the inside colours to even the bases up a little.

Making clouds.

Making clouds.

Gluing the clouds on.

Gluing the clouds on.

Rolling the pipe cleaners up like spirals to form the clouds was A’s idea, and I think it worked well. She rolled up some white pipe cleaners for this.  I was impressed by how carefully and neatly she did this.

Once she had some clouds finished, she glued them at the bottom of the rainbow.

Painting the sky.

Painting the sky.

Having made the rainbow on white paper, A decided that it should really be in the sky, so the paper should be blue. I suggested she could use some watercolour paints to paint her sky. A liked this idea, so out came the paints. She carefully painted around the rainbow and clouds, making a lovely blue sky for her rainbow.

Paper Plate Hot Air Balloon

Standard

IMG_8949There was recently a Hot Air Balloon Festival held near us, so we have been talking about hot air balloons a lot lately. This led to some hot air balloon craft using a paper plate and some cardboard.

The basket attached to the balloon.

The basket attached to the balloon.

The pegs attached to the passengers.

The pegs attached to the passengers.

We used a rectangle of cardboard to make the balloon’s basket, and we attached this to the paper plate using string. A drew a picture of herself and one of her friends to be the passengers. I carefully cut around them, and we glued tiny pegs to the backs of these pictures, and left them to dry.

Placing the cardboard mosaics.

Placing the cardboard mosaics.

Adding more mosaics.

Adding more mosaics.

I had a bag of cardboard mosaics, which are little squares of coloured cardboard, great for decorating art and craft projects, or making pictures with. A brushed Clag glue all over the inside of the paper plate, and then she stuck the mosaics squares on randomly. We had to leave this to dry for a while.

A used the little pegs on the back of her passengers to attach them to the basket. We hung the balloon in her room and her passengers can go for a ride in the breeze from the window.


Painting Pillow Cases

Standard

IMG_8816

3D glitter fabric paints.

3D glitter fabric paints.

3D fabric paint with glitter, oh we had to try that! It came in a pack of six colours with easy to use nozzle applicators. I bought some cheap white pillow cases for the kids to paint on, and I placed some thick cardboard into the pillow case to prevent the paint from running through to the other side. I used pegs around the edges to keep the pillow case flat while the kids were painting.

The tubes only needed light pressure to squeeze the paint out, but A was a little heavy-handed at times, and her paint went on very thickly. She didn’t like the look of this, so she took a paintbrush, and spread the paint out over the pillow case. This made a glitter rainbow that she was very pleased with. She asked me to squeeze more paint out in lines all over the pillow case, and she used the paintbrush to mix it. She had lots of fun doing this, though it meant that the 3D look of the paint was lost.

IMG_8808

Almost finished.

IMG_8803

Spreading the paint.

L preferred to paint a picture on her pillow case. She drew mountains and hills, the sun, grass and herself standing next to her trampoline. She was much better able to control the flow of paint than A, and she even mixed some of the colours to create new colours.

L painting her picture.

L painting her picture.

Once they were done painting we left the pillow cases to dry. We could have painted on the other side after a few hours, but we chose not to. We followed the instructions on the paint pack, leaving them to dry for a couple of days prior to washing them. Once they were washed and dried, the kids put them on their pillows. Due to the 3D nature of the paint, it is raised a little and the kids said it feels funny to sleep on. This is why I asked them not to paint on both sides. They can have the painted side on display during the day, but at night, they just flip the pillow over and sleep on the smooth, unpainted side. They are both happy with this.

IMG_8815

Wooden Beads

Standard
The pile of wooden beads.

The pile of wooden beads.

A found a little box of wooden beads and laces while we were tidying up her room. She asked to do some beading with them today.

Sorting the beads.

Sorting the beads.

She tipped them out into a pile, and then sorted them by colour. There was also a few bigger beads with flowers on them, and A placed all of these ones together. Once she had them in separate piles, I gave her some little cardboard labels on which I had written the French words for the colours. She read each one, and then put the label next to the correct pile.

Sorted beads with French labels.

Sorted beads with French labels.

A placed the beads onto the laces, making patterns with the colours. Once she was happy with her string of beads, we hung them up in her room.

Bead pattern.

Bead pattern.

Bottle Doll

Standard

A is crazy for dolls of all sizes and shapes. She does a lot of pretend play with them, in particular she likes to give them baths…. which are not always so pretend. She carries them around, takes them on outings, and to bed. A asked if we could make some dolls for craft, so we gave it a go. I remembered using a soft drink bottle to make a doll when I was a child, so we started with making a bottle doll.

The doll's head.

The doll’s head.

We had an empty mineral water bottle that we washed out, and removed the label from. I cut out an oval of pink foam for the doll’s face, and A glued it to the top of the bottle. A decorated her doll’s face, giving her googly eyes, and using a marker to make a mouth and a nose.

IMG_8631I twisted two pink pipe cleaners today to make one long one, and I helped A to wrap this around the bottle to make some arms.

Then A got down to the very serious business of dressing her doll. She decided her doll should be wearing a shirt and a skirt. She chose to make the skirt from red tissue paper and blue honeycomb mesh, and the shirt from gold honeycomb mesh and pink crepe paper. I helped her to poke the doll’s arms through the mesh and crepe paper of her shirt. I held the shirt and skirt shut at the back while A taped them together. She is getting much better at removing tape from the dispenser without sticking it to itself now.

Adding hair.

Adding hair.

Once she was dressed, it was time to “make her pretty” according to A. She didn’t like the bald look her doll was sporting, so she added some curly doll’s hair to the top of the bottle and around her face.

Placing her necklace.

Placing her necklace.

A also used some stick-on gems to giver her doll a necklace, some earrings and a little watch.  She found a thin pink ribbon in the craft box and asked me to make her a bow to place in the doll’s hair too.

Adding the final touches.

Adding the final touches.

As a final decoration, A placed a small blue feather as a pendant on the doll’s necklace.

A made a bed for her new bottle doll beside her own bed that evening, so she would be comfy and warm, and ready to play first thing in the morning.


IMG_8639

Counting Pom Poms

Standard

IMG_8622I wrote numbers in the inside base of twelve muffin cases (numbers 1 to 12), and placed the muffin cases into our muffin trays. Then I asked A to place the correct number of pom poms into each muffin case. She used some big plastic tweezers and some scoop tweezers to pick up the pom poms and transfer them to the muffin cases.

The muffin cases numbered and set out.

The muffin cases numbered and set out.

The plastic tweezers.

The plastic tweezers.

For each muffin case I would ask A how many she needed to put in, and she would read the number out loud. She counted each pom pom as she went, and then re-counted them at the end to make sure she had them all right. As she went, I asked her to do some basic subtraction and addition to work out how many pom poms she had to get to reach the right number.


Scooping up some pom poms.

Scooping up some pom poms.

A liked practicing her numbers and it was fun using the tweezers. Some of the little pom poms were hard to pick up, and this was a good chance for her to practice her fine motor skills.

Placing a pom pom into the muffin case.

Placing a pom pom into the muffin case.

Using the tweezers to grab a pom pom.

Using the tweezers to grab a pom pom.

Melty Beads Bookmarks

Standard

IMG_8039All of us are guilty of reading several books at once, leaving bookmarks in them, and forgetting to replace our bookmarks when we are done. L made a lovely bookmark holder out of pop-sticks a couple of weeks ago which is helping us to keep our bookmarks together, but we could do with some more to add to our collection. We were browsing through a Hama Beads Inspiration booklet when we saw some bookmarks made from the beads and some ribbon. We decided to have a go at making some bookmarks like this, though we made up our own bead designs.

IMG_8035

L made this design on our penguin pegboard.

L made this design on our penguin pegboard.

Each of our designs included a hole for the ribbon to be attached, and we tried not to make them too big or they would have been too heavy to stay in the book. Since each one wasn’t very big, we used a few of the smaller pegboards to create them.

IMG_8038I ironed the beads together and when they were cool we threaded some ribbon through the hole we’d left, and tied it off. We made the ribbon long enough that it would lie right along the height of our books and poke out the bottom.

These make for some very cute little bookmarks, and they were really easy to make. L particularly liked that she could make any shape or design she liked with any colours.

L's new bookmark in one of our books.

L’s new bookmark in one of our books.

IMG_8036

Lego School

Standard

Playing with Lego is a lot of fun. Making up Lego kits is great for L because she has to follow the instructions to get the model right, and sometimes she finds that a little difficult. She loves to display the Lego she has built and play with it. Doing free building with the Lego promotes creativity and logic, as the kids have to design, and then build their creations in a way that works and reflects their ideas.

A has only just started to enjoy Lego, until recently she had been exclusively using Duplo, which she loves. Both kids still love building with Duplo, and because of its size I’m not worried about Baby T swallowing it.

A placing trees and flowers ready for demolition.

A placing trees and flowers ready for demolition.

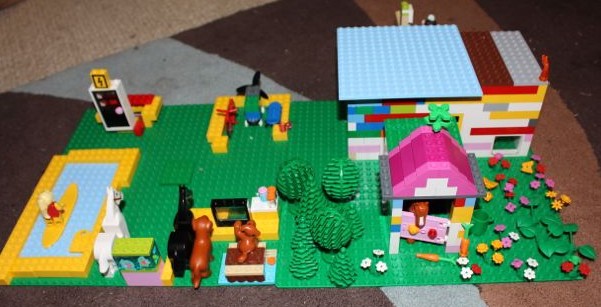
I put out the tub of Lego, gave them each a green base board and asked them to build their ideal school. Between them they decided that L would build the playground, and A would build the school room. A placed trees and flowers on her board first, and then knocked them all down to make room for the school buildings… L’s first addition to the playground was a swimming pool. I helped A set out the base of her building, then she placed windows, a door, and a doggy door (a small opening window). From there she was able to build the walls up.


Making an equipment shed.

Making an equipment shed.

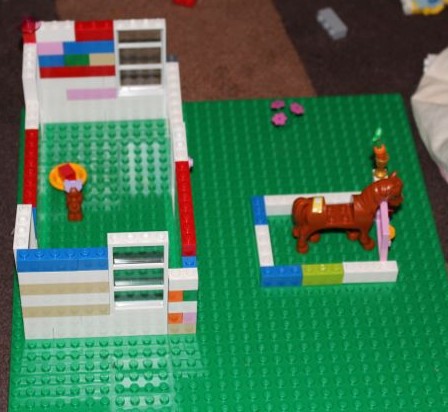
I helped by finding some of the pieces they were looking for, adding some bricks to A’s school room, and putting little flower heads on the flower stalks as requested by A. While we built, we discussed the kind of things their dream schools would have. They both wanted lots of animals at their school. A added a pony and stables to her Lego design, while L added several dogs to the playground. They wanted horses, dogs, bunnies and chickens at their school, as well as lots of trees, flowers and soft grass. A pool was very important to L, and having lots of outdoor equipment like bikes, scooters, hula hoops, climbing frames and a sand pit was desired by them both. They also decided the school should have a nurse with her own little medical area, as well as a swimming instructor by the pool.

Building up the school room.

Building up the school room.

This activity fired up their imaginations as they thought about want they wanted at their ideal schools. They are in a small public school at the moment, so they can’t really have all the elements they mentioned, but one thing they both agreed on was that their ideal school would have awesome teachers, just like the ones at their real school. Hearing that made me happy. While they might like to have some extra things, like a pool, at their perfect school, they are extremely happy with their actual school, and the teaches and staff there. They are also very happy to be back at school this year, and are very eager to learn!

The school and playground.

The school and playground.