This double decker rainbow cake was fun to make and looked great when Big L cut into it (it also tasted really nice).
We started out by making a double quantity of buttercake mix, which in this case was two packet mixes. I sometimes make cakes from scratch and sometimes from packets, depending on cupboard contents, time, and inclination. I happened to have a couple of cake mixes handy, so we mixed them up according to the packet.
In one of my rare moments of organisation, I had previously taken the block of butter out of the fridge to give it plenty of time to soften before mixing up the cake batter. Unfortunately, Big L assumed I’d just forgotten to put it back in the fridge, and tidied it away. So it was hard as a rock when it came time to add it to the mix. Big L suggested that he cut it up for me, and promptly snapped one of our butter knives in two! He then softened it a little in the microwave, but it was still fairly hard when we added it to the bowl, and the batter was a little lumpy as a result, but it didn’t affect the taste at all.

Adding colour to the batter.
The kids both wanted to have a go at using the mixer. Neither one of them managed to turn it off prior to lifting it from the bowl…. Must work on that. Once it was finally mixed, I divided the batter into five bowls, with each bowl holding a little less than the one before it, until the batter was gone. I added a few drops of food colouring to each bowl, and the kids mixed the colour in. We had blue, green, yellow, pink and red.
To cook the cake we used a rectangular baking tray lined with baking paper. I used the biggest bowl of batter first, which was blue, and poured it into the base of the tray, spreading it out to the edges. Then I took the next bowl, the green batter, and poured it into the tray in a stripe down the centre of the blue. I continued this with each of the remaining colours in progressively smaller stripes until all the batter was in the tray. Then we popped it in the oven and waited for it to cook.

Ready to cook.

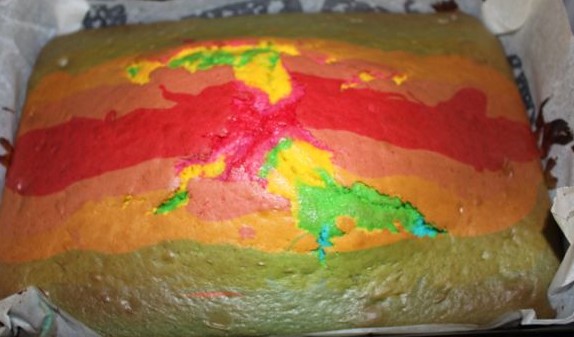
Straight from the oven.
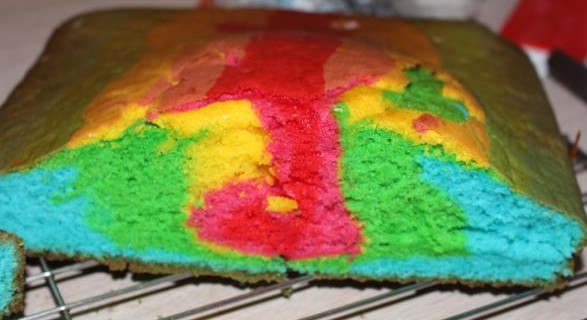
The cake really puffed up in the centre of the tray, but that didn’t really matter. Once it was cool, I cut it in half. The inside of the cake looked awesome! I leveled off the top of the cake to make each half reasonably flat on top so that they could be stacked one on top of the other.

After leveling the top of the cake.

Cut in half.

Ready to spread frosting.
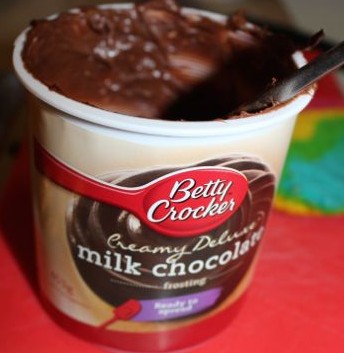
I normally make icing or butter cream from scratch using icing sugar, but I cheated this time and bought a container of Betty Crocker’s Milk Chocolate Frosting. It saved a bit of time and made the cake very chocolatey.
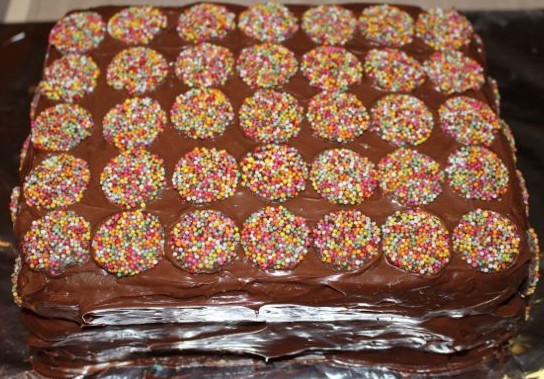
I spread the chocolate frosting between onto the top of one half of the cake, and then placed the second half on top. I made sure it was all straight, and then I covered the whole cake in frosting, smoothing it out with a spatula. I covered the top of the cake in lines of chocolate freckles. I had some left over, so I added these down the sides of the cake.
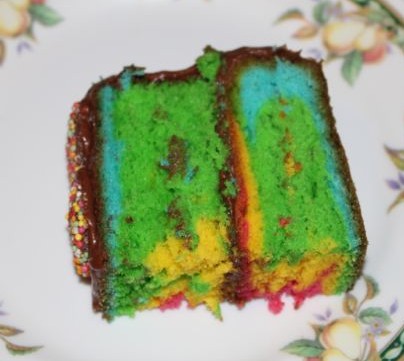
Cutting into the cake and revealing the hidden rainbow surprise was very exciting! The cake was very yummy too. A and L got chocolate frosting all over their faces and hands, while Baby T ate his little piece much more politely.

A slice of surprise rainbow cake.

The inside of the cake.