Blue Sensory Tub

Standard

Now that Baby T is getting older, I have been thinking of ways to get him more involved with out activities. Sensory tubs seem like a great start for him. I made up a very simple tub using blue items. I found a range of blue things from around the house, including a peg, ribbon, pom poms, straws, cup and a spiky dryer ball.
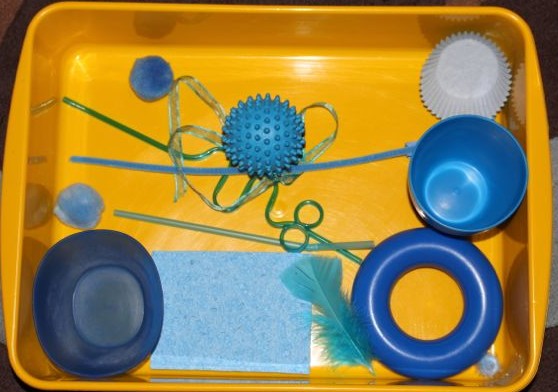
Ready for playing.

Ready for playing.

Putting the straw into the cup.

Putting the straw into the cup.

Baby T was very interested in the tub, and straight away pulled out the cup and curly straw. He spent a lot of time investigating the straw from all angles, and putting it into and out of the cup. He also put the end of the straw into his mouth just like his sisters do.

Tasting a pom pom.

Tasting a pom pom.

The pom poms were also popular, though he tried to put them into his mouth a lot. He licked all the pom poms a number of times too, I suppose their furriness was interesting on his tongue.

L tickled Baby T all over with the feather, making him laugh. He was particularly ticklish on the bottom of his feet, and around his ears. The feather also went in his mouth, as did almost everything in the tub. He even tried to bite a piece out of the sponge.

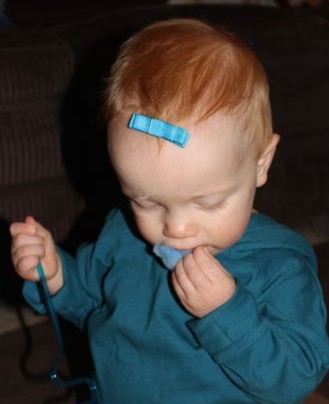
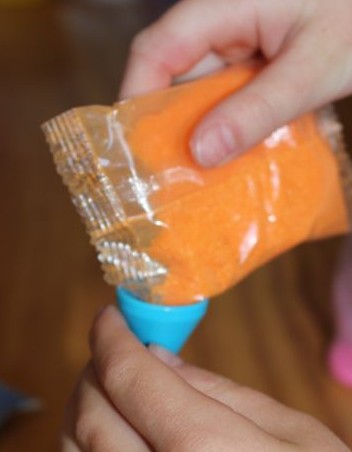
L put the blue clip into his hair, but he didn’t notice, he was too busy putting the smaller items into the cup and the bowl. He crunched up the muffin case, seemingly enjoying the sound that it made.

Crinkling a muffin case.

Crinkling a muffin case.

We let Baby T lead this activity. Throughout it we named each item he picked up, and described it. We talked about the colour blue, the textures and sizes of the items, as well as their uses. He spent much longer exploring this tub than I thought he might, he was extremely interested, and very happy with the contents of the tub. We will be doing more sensory tubs for him soon.

Cardboard Roll Chicks

Standard

IMG_9564

Gluing on the yellow paper.

Gluing on the yellow paper.

The roll covered in paper. The edges have been folded into the roll.

The roll covered in paper. The edges have been folded into the roll.

We used toilet paper rolls for these chicks, but rolls from paper towel or similar could have been cut in half to use instead. We covered the cardboard rolls in yellow paper so that the paper extended beyond the ends of the roll. We cut these sections just to the edge of the cardboard to create a fringe of paper at the ends of the roll.  Then we folded the excess paper fringe into the centre of the roll to make a neatly covered cardboard roll.


Adding feet.

Adding feet.

Adding eyes.

Adding eyes.

I cut out some feet shapes from orange cardboard and the kids added them to the base of their rolls. Each foot had a little tab of cardboard folded up and glued on the inside of the roll. L and A added googly eyes and the beaks were made from a small piece of pipe cleaner folded into a little triangle and glued onto the roll.

L cut down some yellow feathers to the size she wanted, and placed them on the sides of her chick for wings. She also glued a small piece of feather to the back as a tail. A cut up feathers to use on her chick too. She added wings, a tail, and some hair to her chick. Both chicks are really cute.

The back of L's chick.

The back of L’s chick.

Showing the placement of feathers on A's chick.

Showing the placement of feathers on A’s chick.


Sand in a Bottle

Standard

IMG_9460I had been sourcing supplies to try layering coloured sand in bottles, when I saw this kit advertised in the Scholastic Book Club (Australia). It was a good opportunity for the kids to try this craft activity on a small scale. The kit came with small bags of coloured sand, plastic bottles and stoppers, a little funnel and a styling stick. The sand was purple, orange, blue, pink and yellow.

Some of the bags of sand.

Some of the bags of sand.

Pouring sand.

Pouring sand.

Each of the kids picked a bottle and got started. Surprisingly we had very few spills of sand, and the kids were very careful pouring it into the funnel. They even took turns using the funnel to pour sand into their bottles. It was nice to see them sharing.

L's bottle.

L’s bottle.

A’s first bottle was very tall and skinny, so it didn’t take much sand to make thick layers. L made her layers reasonably flat, while A liked her layers to be angled. They were unable to use the styling stick on these bottles, as the shape of them prevented the stick getting to the edge to push the sand down.

Using the styling stick.

Using the styling stick.

A's second bottle.

A’s second bottle.

A filled another bottle and we were able to use the styling stick in this one as the sides were straight and flat. A would pour a few layers, and then scrape the stick down the inside to push some of the sand down through the layers, forming unique variations in the layers. This looked really good.

Once the bottles were filled, we placed a stopper in the top to prevent the sand escaping. The sand settled a little too. Then they were ready to be displayed.

This was a fun activity, and the kids really liked it. The only disappointing thing was that the plastic of the bottles wasn’t as clear as glass would have been. As we poured the sand into the bottle some coloured dust stuck to the inside of the bottles dulling the colours a bit. This was a fairly minor issue though, and it didn’t detract from the fun of filling the bottles with sand.

I would like to try this activity again using glass bottles and other colours of sand. The layers of sand in the bottles look fantastic displayed on our shelf.

IMG_9454


Egg Nests

Standard

IMG_9440I’ve made these little egg nests a few times in the last couple of years, but I can’t remember where the idea came from originally. They are a big hit with the kids, and really easy to make.

Mixing.

Mixing.

I’m not great at measuring things when I cook, and if I’m not following a recipe I’m even worse, so I just estimated the amounts. I used about three cups of Kelloggs rice bubbles, and about two-thirds of a packet (250g) of Cadbury white chocolate melts.

The kids put the patty pan cases into the muffin tray, and then got ready to mix the chocolate and rice bubbles. I melted the chocolate in the microwave in a ceramic bowl in thirty second bursts, stirring regularly until the chocolate was smooth. I poured it into the mixing bowl and the girls got mixing. Their wooden spoons clashed a few times, and some of the mix went flying, but they had fun, and they got the job done. It’s best to mix quickly before the chocolate cools too much.

Filling the cases.

Filling the cases.

Once mixed, we used a desert spoon and a teaspoon to place some of the mixture into each of the patty pan cases. We pushed the mixture down, and then formed a well in the centre using the teaspoon (this is where the eggs sit). Once we’d filled the muffin tray, we still had some mixture left over, so I carefully spooned it into some loose patty pan cases in the same way. All up this mixture made sixteen egg nests.

Adding the eggs.

Adding the eggs.

Then it was time to add the little eggs to the nests. These eggs are Cadbury mini-eggs which are milk chocolate on the inside with a candy coating. I like these mini-eggs because they have speckled shells, and nice colours, but I only seem to be able to get them at Easter. We have used other mini-eggs at other times of the year which were bright colours, and a little smaller than these, I think. They still worked nicely. The kids placed two or three eggs into each nest (and possibly a couple into their mouths!). The tray and the extra patty pan cases went into the fridge to set.

Once the chocolate was set these egg nest treats didn’t last long!

Ready to eat.

Ready to eat.


Simple Easter Basket

Standard

IMG_9366

Adding the pipe cleaner handle.

Adding the pipe cleaner handle.

We made very simple Easter baskets this year out of plastic bowls. L and A each chose a coloured bowl, and I used a single hole punch to make a hole on either side of it. Through the holes we threaded a pipe cleaner, twisting it around on itself at each side to secure it to the bowl. The pipe cleaner was the handle of the basket.

A adding stickers to the inside of her basket.

A adding stickers to the inside of her basket.

A chose to decorate her basket on the inside, adding lots of small Easter stickers around the inside, as well as some stickers on the base. L decided to put most of her stickers on the outside of her basket, with just a single bunny on the inside base. Then they were ready for the egg hunt.

The outside of L's basket.

The outside of L’s basket.

The kids ran around finding the little eggs hidden by the Easter Bunny and adding them to their baskets. The single moveable handle meant that the baskets could become unbalanced easily if the eggs were on one side of the bowl, so they had to be careful not to tip the baskets up and spill the eggs. L collected more eggs than A, so Big L helped the kids to count all of the eggs and divide them equally between them. Baby T only found two eggs, but we thought that was plenty for such a little boy. He did enjoy eating one of them very much, once I took the foil off for him.

After a successful egg hunt.

After a successful egg hunt.

Dyeing Easter Eggs

Standard

IMG_9169

L blowing out an egg.

L blowing out an egg.

A blowing out an egg.

A blowing out an egg.

Before we started this activity, I washed the eggs to remove any dirt or chicken poop from the shells. We had to blow the egg out of its shell before we could dye them, which meant making a small hole in the top of the egg, and a slightly larger hole in the other end. I was going to use a metal skewer to puncture the eggs, but I couldn’t find one, so an old-fashioned can opener did the trick. To break up the egg to make it easier to blow out, I inserted a meat thermometer and swirled it around inside for a few moments. A toothpick or wooden skewer would have also worked. Each of the kids had a go at blowing out the eggs by placing their mouth over the small opening and blowing through the egg so that the egg white and yolk was forced out the other hole into a bowl. Once all the egg came out, we ran some water into the shell and swished it about to remove any remaining traces of egg, and then blew that out too.

L dripping wax onto the eggshells.

L dripping wax onto the eggshells.

Adding wax to the shells.

Adding wax to the shells.

The eggshells needed to be dry before we added wax to them, so we dried them in a tea towel, being careful not to break them. I lit a candle with a match and let some of the wax melt. Then we dropped the wax onto each shell, making spots and lines. Melted wax is hot and can burn, so it was particularly important to do this part carefully and with adult supervision. L had a go at placing wax on the shells, but A did not, as I felt she was a bit young to do this without incidence.

The wax dried quickly on the shells, and then they were ready for dyeing. We used food colouring in cold water for this part. We placed blue colouring into a saucepan to do multiple eggshells, while other shells were placed in cups each containing red, yellow and green coloured water. Egg shells float, so to keep them down, I filled them with the water, making them sink. We left the shells to colour for about an hour.

Dyeing eggshells in cups.

Dyeing eggshells in cups.

After dyeing.

After dyeing.

Prior to removing the wax.

Prior to removing the wax.

When I removed the shells from the coloured water, we shook out as much water as we could, blew out the rest, and placed them on paper towel to help absorb any excess water. Most of the wax scraped off easily with my fingernails, and the loose wax wiped off with a tea towel. The wax protected the shell from the food colouring, creating patterns of colour and natural egg shell. Blue and red were the strongest colours, and green was light, but still good. The yellow was hardly visible at all, though looking closely, it was possible to see the pattern. The colours may have been more vivid if I had had lighter coloured eggs to work with.

The blue eggs after the wax is removed.

The blue eggs after the wax is removed.

A adding stickers to the egg basket.

A adding stickers to the egg basket.

The kids decorated a plastic ice cream container that I had covered in white paper. They added Easter stickers and some curly ribbon to make it pretty on the outside. Inside, we placed some bunched up pink tulle to make a cushion for the egg shells to lay in. This has been placed on the table as a centre-piece.

A did drop a couple of the eggshells on the floor after we were finished, and they broke open, so she learnt to be more careful handling the shells as they are only fragile.

IMG_9173

Easter Chocolates

Standard

I wanted to try making some Easter shaped chocolates this year with the kids, as I thought it would be fun. We were given a number of plastic chocolate moulds by a good friend, and my mother also gave us a silicone chocolate mould to try. We started with the silicone mould.

IMG_9124We didn’t make our own chocolate, we used choc melts, in milk chocolate and white chocolate. I melted small batches of the melts in a ceramic bowl in the microwave for about 30 seconds at a time. Each time the microwave dinged, I mixed the chocolate with a spoon to make sure that it was melting evenly and not burning on the bottom of the bowl. It’s very important to remove the spoon from the bowl before it is placed in the microwave!

Chocolate mould.

Chocolate mould.

I did not let the kids handle the bowl with the melted chocolate, as it can be very hot. I used an oven mitt to prevent burning myself on the bowl when removing it from the microwave. After a minute or two it was normally cool enough to touch, but we still had to be very careful.

Mixing the hot chocolate.

Mixing the hot chocolate.

Ready for the fridge.

Ready for the fridge.

As silicone is floppy, we used a plastic cutting board underneath the mould to prevent it from drooping and spilling the chocolate. We transferred the melted chocolate into the mould one spoonful at a time, carefully filling each hole to the top and smoothing it out. Inevitably, we dripped chocolate onto the cutting board, mould and even on the bench. The kids didn’t mind swiping it up on a finger and popping it in their mouths. Once all the holes on the mould were filled, we placed it in the fridge to set.

Placing the chocolates onto the cellophane.

Placing the chocolates onto the cellophane.

We made some plain milk chocolate, some white chocolate, and some we mixed together to marble the chocolate. I also had a go at layering the chocolate. I found it was best to let the first layer set in the fridge for about fifteen minutes before adding the second layer.

Forming a bundle.

Forming a bundle.

The kids cut some cellophane into squares and placed about four chocolates onto each square, then brought the cellophane up around the chocolates creating a little bundle. We added some curling ribbon to tie it up, and I curled it with scissors. L tried to curl her own ribbon, but she didn’t quite manage it. They want to give their little parcels of Easter chocolates to relatives.

Little parcels of Easter chocolates.

Little parcels of Easter chocolates.

Artemis Fowl by Eoin Colfer

Standard

IMG_9101Artemis Fowl by Eoin Colfer, paperback novel, 280 pages, first published by Viking in 2001, this edition published by Puffin Books in 2002.

Artemis Fowl is not an average twelve year old boy. He is a criminal mastermind isolated on an enormous estate in Ireland, where he is constantly accompanied by his bodyguard, Butler, but is not restricted by any parental or guardian influence. His family’s vast fortune, accrued over many generations of criminal Fowls, has been lost, and Artemis is determined to restore it. A spot of supernatural kidnapping for ransom should do it, all he has to do is find a fairy to kidnap. Though he is a genius with an elaborate and thorough plan, when he captures Captain Holly Short of the Lower Elements Police Reconnaissance Unit (LEPcon), he gets more than he bargains for.

I’d been thinking about reading Artemis Fowl for a while (I wanted to see whether it lived up to the hype), when I came across a copy in excellent condition in a secondhand bookstore. It was also on sale, so I think it was a sign that it was time to read it! I was not disappointed. From the first chapter I was hooked. It is a fast paced adventure full of fantastical creatures, villains and plenty of action. There are fairy police, an egotistical centaur, a humongous troll, goblins and a tunneling and devious dwarf, all of which come to life in the pages of Artemis Fowl. And Artemis himself is a very interesting character. There are many stories of young heroes saving the day, but not too many telling the exploits of a young criminal using his excessive intelligence to create havoc and amass a fortune. I liked this different perspective, even though he is undoubtedly the baddie, Artemis didn’t seem like the enemy. I found myself hoping there would be some way for both Artemis and the fairies to come out on top.

The plot of Artemis Fowl contained suspense and surprises, and it wasn’t predictable as some novels for younger readers are. The characters developed throughout the story too, providing a richness to the tale, and leaving me wanting to find out more about the Lower Elements, the People and Artemis. There were also little things left unknown, which could be revealed later in the series.

The complexity of the storyline and some elements of violence probably lends itself more towards upper primary to lower high school students, though with guidance younger children may also enjoy this book. I thoroughly enjoyed Artemis Fowl, and I had trouble putting it down to sleep at night. When I can, I will find more of the books from the Artemis Fowl series to read. I am very interested to find out what trouble Artemis is plotting next.

Sheep Cupcakes

Standard

IMG_8959A while ago I saw some of the librarians at our local library had made foods inspired by books, and they had made sheep cupcakes for Where is the Green Sheep? by Mem Fox and Judy Horacek. We own this book, and it gets read over and over to the point where both L and A are able to recite the words! I love the idea of book inspired food, and these sheep cupcakes looked simple enough, so I gave them a go.

Cupcakes ready for icing.

Cupcakes ready for icing.

Big L made a double batch of butter cupcakes, and when they were cool, I iced them with basic vanilla frosting. Then I covered each one with mini-marshmallows (I think the pack called them mallow bakes). I had these in pink and white, so we had some pink sheep and some white sheep.

Covered in mini marshmallows.

Covered in mini marshmallows.

For the heads I used some honeycomb chocolate pods, which are like a small biscuit cup filled with chocolate and come in a number of different flavours (I think they are made by Mars). The filling side of the pods was facing out, and I drew on this using white chocolate writing fudge to form the facial features and ears of each sheep.

It didn’t take me as long as I expected to make these sheep cupcakes, and I was quite happy with the result. Everyone thought they were very yummy too.

IMG_8964

Arrowroot Biscuit Easter Eggs

Standard

IMG_9084We go through a lot of milk arrowroot biscuits in our house, especially baby T, he loves them!

Biscuits and 100s and 1000s ready for decorating.

Biscuits and 100s and 1000s ready for decorating.

Milk arrowroots are oval shaped, and close enough to egg-shaped that we tried decorating them to make some non-chocolate Easter eggs. The icing is quite sweet though, so these aren’t a less sugary alternative to chocolate eggs, but they were fun to make.

I mixed up some icing sugar with a little bit of milk in a bowl, and then I transferred some to a zip lock snack bag. I added some vanilla essence and some food colouring to the bag, sealed it, and squished it all together to mix it. When it was ready to use, I snipped a tiny triangle off one corner so that we could use it as a piping bag. I added a bit too much milk to the first lot of icing so it was a little runny, but the other lots were a better consistency for piping.

Spreading icing with a knife.

Spreading icing with a knife.

Piping icing onto a biscuit.

Piping icing onto a biscuit.

The kids used the icing bags to spread icing across the top of the biscuits, on some making patterns with the colours, on others just covering the whole biscuit in the same colour. On some of them they used a knife to spread the icing out. They added some 100s and 1000s to the top of the biscuits, and some they even dipped in the bowl of 100s and 1000s to completely cover the top.

IMG_9078

This was a very messy activity! There was icing, 100s and 1000s and icing sugar everywhere (including all over the kids), but they had a ball. They also enjoyed eating some of their biscuit eggs along the way 🙂

The mess at the end.

The mess at the end.